The Rise of Studio ADUs: Maximizing Small Spaces
Studio ADU floor plans are compact, efficient living spaces that typically range from 200 to 500 square feet, featuring an open-concept design that combines living, sleeping, and kitchen areas with a separate bathroom. If you’re looking for the perfect studio ADU plan, here’s what you need to know:
- Size Range: Most studio ADUs are 200-500 sq ft
- Popular Size: 360-400 sq ft is the sweet spot for functionality
- Key Elements: Open floor plan, kitchenette, full bathroom
- Minimum Size: 150 sq ft in San Diego, 200 sq ft in many other California cities
- Cost Efficiency: Studio plans are the most affordable ADU option, with design costs starting around $5,000
The tiny house movement meets practical real estate investment in the form of studio Accessory Dwelling Units (ADUs). As housing costs soar and urban spaces shrink, these compact, self-contained living spaces are becoming increasingly popular solutions for homeowners looking to maximize property value and functionality.
With California’s progressive ADU laws and pre-approved plans available in many jurisdictions, it’s never been easier to add one of these versatile spaces to your property.
“We truly want you to love your new ADU design,” as one provider notes, highlighting the importance of thoughtful planning even in the smallest spaces. With the right design approach, a studio ADU can feel surprisingly spacious while delivering significant returns on investment.

Relevant articles related to studio adu floor plans:
– 400 square foot adu plans
– adu plans with garage
– prefab adu los angeles
What Is a Studio ADU and Why Go Mini?
Picture this: a cozy, efficient living space that packs everything you need into one smartly designed area. That’s the essence of a studio ADU – a complete, independent dwelling unit built on the same property as your main home. According to California Government Code section 65852.2, to legally qualify as an ADU, these spaces must include both a kitchen and bathroom.
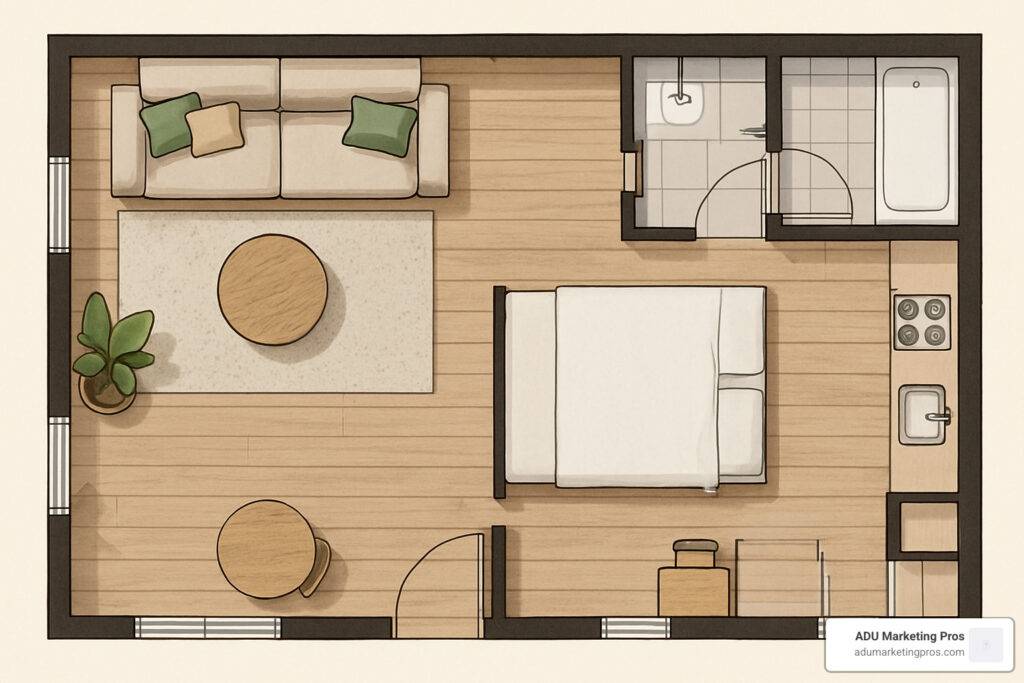
What makes a studio ADU floor plan special is its open-concept design. Unlike larger ADUs with separate rooms, studios combine living, sleeping, and kitchen functions in one flowing space, with only the bathroom walled off for privacy. It’s similar to a well-appointed hotel suite, but designed for comfortable day-to-day living.
You have several options when considering a studio ADU: a detached backyard cottage, an attached studio that connects to your house, or converting existing space like a garage or basement.
The beauty of the studio approach lies in its efficiency. By eliminating interior walls and hallways that eat up precious square footage, these compact spaces feel surprisingly roomy. As one builder aptly puts it, “The smart design ensures the ADU feels larger than its actual size.”
Key Benefits in a Nutshell
The compact nature of a studio ADU floor plan delivers impressive advantages for homeowners.
First and foremost is affordability. With ADU construction running between $180-350 per square foot in California, studios represent the most budget-friendly option. A typical 400 square foot studio might cost $72,000-$140,000 to build – significantly less than larger units.
Your wallet gets another break thanks to California’s impact fee exemption for ADUs under 750 square feet. Since most studio ADU floor plans range from 200-500 square feet, you’ll easily qualify for this exemption.
The permitting process also tends to move faster with smaller units, and many California cities now offer pre-approved studio plans that can dramatically speed up the approval timeline.
Energy efficiency represents another significant benefit. These compact spaces require less heating and cooling, translating to lower utility bills and a reduced environmental footprint.
Best Uses for a Studio ADU
The versatility of studio ADU floor plans makes them perfect for numerous lifestyle needs.
Many homeowners create the ultimate home office plus. A studio ADU provides a dedicated professional workspace with the bonus of a private bathroom and kitchenette – ideal for those who need separation from household distractions.
For families navigating multigenerational living, a studio ADU makes an excellent caregiver suite. It offers independence while keeping loved ones or care providers close by.
The income potential is impressive too. As a short-term rental, studio ADUs excel on platforms like Airbnb or VRBO, often commanding $100-200 nightly in desirable California locations.
Empty nesters might consider a creative downsizing solution – moving into the studio ADU themselves while renting out their main house. This approach generates significant income while simplifying maintenance and lifestyle.
As one ADU specialist notes, “A 360-square-foot studio ADU is a compact yet highly functional option.” This size represents the sweet spot where affordability meets livability.
Understanding Studio ADU Floor Plans
When exploring studio ADU floor plans, understanding the regulatory parameters and design considerations is essential to creating a space that works for your specific needs.
The heart of any successful studio ADU is a thoughtfully designed layout that makes the most of every square inch. Most designs feature an open space that combines living and sleeping areas, with a compact kitchenette typically positioned along one wall. You’ll need a full bathroom (usually at least 5’×8′), clever storage solutions throughout, and many homeowners opt to include an outdoor living space to make the footprint feel larger.
California regulations require minimum 4-foot setbacks from property lines and at least 6 feet of separation from your main house. These requirements will shape where you can place your ADU and how large it can be on your property.
One of the smartest aspects of well-designed studio ADU floor plans is the “single wet wall” concept. By placing the kitchen and bathroom back-to-back to share plumbing, you can save thousands in construction costs while creating a more logical layout.
“When we design a studio ADU, we’re always looking for these efficiency opportunities,” one architect told us. “Shared plumbing walls can save clients 10-15% on their overall budget.”
Typical Studio ADU Floor Plans by Square Footage
Studio ADU floor plans generally fall into three size categories:
Micro (200-250 sq ft) spaces are essentially tiny houses. They typically include a Murphy bed or convertible sofa bed, a minimal kitchenette, a compact bathroom with shower stall, and limited built-in storage. These work beautifully for occasional guest use or a home office plus.
Compact (251-350 sq ft) units follow the “efficiency apartment” model. These spaces can fit a queen bed plus a small seating area, include a kitchenette with apartment-sized appliances, a three-quarter bathroom, and modest closet space. They’re perfect for a single occupant or part-time rental.
Comfortable (351-500 sq ft) layouts offer the “studio apartment” standard. These include a defined sleeping area that accommodates a queen or king bed, a full kitchen with standard-sized appliances, a full bathroom, generous storage options, and maybe even an eating nook or workspace.
Many studio ADU floor plans also incorporate loft options for additional storage or sleeping space, especially in designs with vaulted ceilings.
“The Elm studio ADU covers 400 sq ft, offering a straightforward, efficient living space,” notes one provider, highlighting the popularity of models in the “comfortable” range.
Minimum & Maximum Rules for Studio ADUs in CA
California state law creates the framework for ADU sizes, while your local city or county may add their own requirements:
State law caps detached ADUs at 1,200 square feet, though most studio designs stay well below this maximum. At the other end of the spectrum, San Diego permits ADUs as small as 150 square feet, while many other California cities require at least 200 square feet for studio ADUs.
Height limitations typically max out at 16 feet, though some cities allow up to 25 feet depending on how tall your main house is. For setbacks, you’ll generally need to place your ADU at least 4 feet from side and rear property lines.
Los Angeles offers several pre-approved studio ADU floor plans through their Standard Plan Program, with sizes ranging from 200 to 500 square feet. These plans have already been reviewed for code compliance, which can shave weeks or even months off your permitting timeline.
“ADUs under 750 sq ft cannot be charged impact fees in many jurisdictions,” notes one builder, highlighting a significant financial advantage for studio ADUs. For more details on size limitations, check out our guide on ADU Size Restrictions and How Big Can an ADU Be in California?
Design Features & Space-Saving Hacks
The magic of studio ADU floor plans lies in their clever use of space-maximizing features that transform compact footprints into homes that feel surprisingly spacious and functional.

When you step into a well-designed studio ADU, the first thing you’ll likely notice is the vaulted ceiling. Even a modest 9-10 foot ceiling height opens up the space dramatically, creating a sense of volume that compensates for limited square footage. The best designs reach 12-15 feet at the peak, drawing the eye upward and creating an airy atmosphere.
Smart furniture choices make all the difference in these compact spaces. Murphy beds that tuck away during daylight hours instantly transform your sleeping area into living space. Today’s models often integrate seamlessly with desks, sofas, or storage units for true dual functionality.
Built-in storage is the unsung hero of studio ADU living. Custom cabinetry that stretches from floor to ceiling maximizes every vertical inch while minimizing the footprint. We’re particularly fond of under-stair storage in lofted designs, platform beds with pull-out drawers, and window seats that offer both seating and hidden storage compartments.
For natural light without sacrificing privacy, clerestory windows work wonders. These high windows flood the space with sunshine while keeping prying eyes out and preserving valuable wall space for furniture placement or artwork.
The indoor-outdoor connection can effectively double your usable space during good weather. French doors, sliding glass walls, or modern bifold systems visually extend your living area onto patios or decks.
Customizing Your Studio ADU Floor Plans for ROI
When investing in a studio ADU floor plan, certain customizations can significantly boost your return on investment while keeping costs reasonable.
Universal design features expand your potential rental market and future-proof your investment. Zero-threshold showers, slightly wider doorways, and accessible controls make the space suitable for all ages and abilities. These thoughtful touches often cost very little during initial construction but can make your ADU marketable to a much broader audience.
Forward-thinking homeowners are making their ADUs solar-ready even if they’re not installing panels immediately. Designing the roof orientation and electrical systems to accommodate future installation increases property value and appeals to environmentally conscious renters.
Smart home integration has become an expectation rather than a luxury. Pre-wiring for smart thermostats, security systems, and lighting controls adds minimal cost during construction but significant appeal for modern renters.
Consider creating a design that works with tiered finish packages, allowing you to upgrade materials based on your budget and target market without changing the underlying floor plan.
Maximizing Light, Privacy & Flow
The most successful studio ADU floor plans strike a delicate balance between openness and privacy through thoughtful design choices.
L-shaped layouts naturally define separate zones for living and sleeping without requiring walls that would make the space feel smaller. This simple footprint change creates distinct areas that maintain visual connection while providing a sense of separation between functions.
For additional definition without walls, consider courtyard screens, partial dividers, or strategic shelving units. These elements provide visual separation while maintaining an open feel and allowing light to flow freely through the space.
Skylights offer a brilliant solution when privacy concerns limit traditional windows. This overhead natural light reduces the need for window wall space that might compromise privacy from neighbors.
Don’t forget the power of strategic fencing to create private outdoor living areas. Privacy fences or trellises with climbing plants can transform a small patio into a secluded retreat that effectively extends your living space.
For more inspiration on maximizing your studio ADU’s interior, check out our comprehensive guide to ADU Interior Design Ideas.
Costs, Permits & Pre-Approved Shortcuts
Let’s talk money, paperwork, and clever shortcuts for your studio ADU floor plans. Understanding the financial landscape is essential before diving into your ADU journey.

When budgeting for your studio ADU, expect design fees starting around $5,000 for pre-designed plans, while custom designs typically run $8,000-$15,000. Engineering costs range from $2,000-$5,000 for structural calculations and energy compliance documentation.
Permitting costs typically range from $5,000-$15,000 depending on your city and project complexity. Construction costs fall between $180-$350 per square foot, meaning a 400 sq ft studio might cost between $72,000-$140,000 to build.
“ADU plan costs range from $5,000 (pre-made) to $30,000+ (custom),” as industry experts note. This wide range highlights the significant savings available through pre-approved or standardized plans.
Don’t forget about utility connections ($5,000-$20,000) and finishes ($10,000-$30,000) depending on your preferences.
The good news? Financing options have expanded wonderfully in recent years, with many lenders now offering specialized ADU financing programs.
Faster Paths with Pre-Approved Studio ADU Floor Plans
Here’s where things get exciting: many California cities now offer pre-approved studio ADU floor plans that can save you serious time and money!
Los Angeles, San Diego, San Jose, and other forward-thinking cities maintain libraries of pre-approved plans that homeowners can use either for free or at significantly reduced cost. These plans have already passed through the rigorous review process, so you’re essentially getting a shortcut through the permitting maze.
Using these pre-approved plans can slash your permitting costs by 30-50% and reduce review times from months to just a few weeks. The San Jose catalog is particularly impressive, offering numerous studio options ranging from 250-500 square feet.
The Los Angeles Department of Building Safety (LADBS) Standard Plan Program features over 70 pre-approved designs from various architects and design firms, many of which are perfect studio layouts. You can browse their Approved Standard Plans online to find inspiration.
Hidden Costs & Common Pitfalls
Let’s be real—even the best-planned projects encounter surprises. When budgeting for your studio ADU floor plan, keep these potential hidden costs in mind:
Site work can be a budget-buster, especially on sloped lots. Grading, drainage solutions, and soil compaction might add $5,000-$20,000 you hadn’t planned for. Sewer upgrades are another common surprise—some properties require capacity upgrades or entirely new connections.
While ADUs under 750 sq ft are exempt from many impact fees, some school districts still assess fees based on square footage. Be sure to check with your local jurisdiction.
Planning to rent your ADU? You might need separate utility meters, adding $2,000-$8,000 to your project. And never underestimate the cost of time—extended permitting processes can increase carrying costs and contractor holding fees.
We always advise our clients to build a 15-20% contingency into their budgets for those inevitable surprises.

Planning & Building Roadmap
The journey from concept to completion of your studio ADU floor plan follows a predictable path, though timelines can vary based on your location and project complexity.

Your ADU journey typically begins with a feasibility study taking 2-4 weeks. During this crucial first step, you’ll analyze your property’s zoning compliance, assess utility availability, develop a preliminary budget, and calculate potential ROI.
Once you’ve confirmed your project is viable, the next 2-3 weeks involve site plan development. This is where you’ll document existing conditions, optimize placement to comply with setbacks, plan access routes, and begin thinking about landscape integration.
The design development phase typically spans 3-6 weeks and represents the fun part for many homeowners. You’ll select or customize your floor plan, choose exterior materials and elevations, refine the interior layout, and possibly explore 3D visualizations.
Moving into construction documentation (4-8 weeks), your designer will create detailed drawings for permitting and construction, engage structural engineers, complete energy calculations, and specify all materials and systems.
The plan check and permitting phase often tests homeowners’ patience, lasting anywhere from 6-16 weeks depending on your jurisdiction and whether you’re using pre-approved plans.
Once permits are in hand, construction typically takes 3-6 months, covering site preparation, foundation work, framing and rough-ins, installing finishes and fixtures, and completing landscaping.
The final phase—inspection and occupancy—usually takes just 1-2 weeks. This includes building department final approval, receiving your certificate of occupancy, activating utilities, and preparing for move-in or tenant occupancy.
Studio ADU Floor Plans & Local Zoning—What to Watch
Local zoning regulations can significantly impact your studio ADU floor plan options, and navigating these rules requires careful attention to detail.
Lot coverage limits represent one of the most common constraints. Many jurisdictions restrict the percentage of your lot that can be covered by structures, which might limit your ADU’s footprint even if you have plenty of yard space.
Height restrictions typically cap single-story ADUs at 16 feet, but this varies based on zone and proximity to property lines. If you’re dreaming of vaulted ceilings or a sleeping loft, verify these height allowances early in your planning process.
Fortunately, most California jurisdictions now offer parking waivers for ADUs, especially those within half a mile of public transit. This removes what was previously a major obstacle for many homeowners.
Properties in California’s Coastal Zone face additional regulatory oversight from the Coastal Commission, potentially affecting both design and placement.
Steps to Personalize and Scale
Once you’ve selected a basic studio ADU floor plan, thoughtful personalization can dramatically improve both livability and value.
Start by selecting a base plan that aligns with your primary goals, whether that’s maximizing rental income, creating a work-from-home space, or preparing for multigenerational living.
Most pre-approved plans can accommodate minor revisions without triggering a full plan review. Consider adjusting window placements for better light or privacy, relocating doors for improved flow, refining interior layouts to suit specific furniture, or substituting exterior materials to complement your main house.
Don’t skip the structural engineering step. Even with standardized plans, your specific site conditions, soil type, and local requirements need professional evaluation.
Creating a cohesive design through coordinated finish packages makes even the smallest studio feel intentional and polished. Consider how flooring materials, cabinet styles, countertops, lighting and plumbing fixtures work together to create a unified aesthetic.
Finally, explore sustainable upgrades that may qualify for rebates or incentives. Consider preparing for future solar panels, upgrading insulation beyond code requirements, selecting high-efficiency appliances, installing water-conserving fixtures, or incorporating sustainable materials.
Frequently Asked Questions about Studio ADU Floor Plans
How much does a 400 sf studio ADU cost to build?
Construction alone for a 400 square foot studio ADU floor plan typically ranges between $72,000 and $140,000, based on the industry standard of $180-350 per square foot across California markets.
This range depends on several factors: foundation type (concrete slab vs. raised foundation), exterior finishes (stucco vs. custom siding), interior fixtures and finishes (basic vs. luxury), and property characteristics (flat lot vs. sloped site requiring extensive grading).
When you factor in everything—design fees, permits, utility connections, and site preparation—most homeowners end up spending between $120,000 and $200,000 for a complete 400 sf studio ADU project in California.
Prefab or modular options might seem like cost-savers, but be aware that transportation, crane costs, and site preparation can offset those savings, especially in dense urban areas with limited access.
Are there pre-approved studio ADU floor plans in my city?
Good news! Many California cities now offer pre-approved studio ADU floor plans that can save you significant time and money. These plans have already been reviewed for code compliance, meaning you can skip much of the lengthy design and review process.
In Los Angeles, the Standard Plan Program includes numerous studio options ranging from 200 sf to 500 sf designs. San Diego residents can access plans for studios as small as 150 sf, while San Jose maintains their ADU Pre-Approved Program with multiple studio layouts.
Other cities aren’t far behind—San Francisco provides prototype designs in their comprehensive ADU Handbook, while Peninsula communities like Palo Alto and Mountain View have developed their own catalogs of pre-approved plans.
Using these pre-approved plans typically saves homeowners between $5,000-$15,000 in design fees alone, and the permitting process often moves 50-75% faster.
How will a studio ADU affect my property value and taxes?
Adding a studio ADU floor plan to your property creates a fascinating financial ripple effect that impacts both your home’s value and your tax situation.
On the property value side, we typically see studio ADUs add between $100,000-$300,000 to home values in California’s competitive markets. The return on investment is impressive, with most projects recouping 70-100% of construction costs immediately in added property value.
The tax picture is more nuanced, especially in California. Thanks to Proposition 13, only the ADU portion of your property gets reassessed at current market rates—your main house keeps its existing tax basis. This means your annual property tax increase typically lands between $1,000-$3,000 for a studio ADU.
If you decide to rent out your studio, that rental income is taxable. However, associated expenses—including property taxes, insurance, maintenance, and depreciation—are generally deductible, which can significantly offset your tax liability.
The versatility of studio ADUs makes them particularly valuable additions. As one real estate specialist told me, “Studio ADUs are ideal for guest houses, rentals, or minimalist living, offering an affordable, stylish way to expand your property.”
Conclusion
Studio ADU floor plans offer a brilliant solution to California’s housing challenges. They give homeowners a way to boost property value and utility with a smaller investment compared to larger ADU options. Whether you’re considering a cozy 200 square foot “micro” design or a more spacious 500 square foot layout, these versatile spaces adapt to whatever you need – rental income, guest accommodations, a dedicated home office, or a comfortable space for family members.
The financial impact alone makes them worth considering. With construction starting around $72,000 for basic models and potential monthly rental income between $1,500-$2,500 in major California markets, the numbers speak for themselves.
The regulatory advantages can’t be overlooked either. Their smaller size exempts them from impact fees and streamlines the permitting process – particularly when you use pre-approved plans that many jurisdictions now offer.
I love the versatility of studio ADUs – their open-concept design easily shifts with your changing needs. What starts as a rental unit might later become a caregiver suite or home office.
For environmentally-conscious homeowners, the sustainability aspect is particularly appealing. Smaller spaces naturally consume less energy and have a lower environmental footprint, aligning perfectly with California’s climate goals.
As one builder beautifully puts it, “The smart design ensures the ADU feels larger than its actual size.” This perception of spaciousness isn’t accidental – it comes from thoughtful design elements like vaulted ceilings, clever built-in storage, and seamless indoor-outdoor connections.
At ADU Marketing Pros, we specialize in helping construction and architecture firms showcase their expertise in creating these efficient, high-impact spaces. Our targeted marketing strategies connect talented builders with homeowners who want to maximize their property value through studio ADUs.
Ready to explore how a studio ADU could transform your property? Visit our website or reach out for a consultation to discuss your specific needs. We’ll connect you with qualified professionals in your area who can turn your ADU dreams into reality.
More info about our ADU marketing services — powered by ADU Marketing Pros.