Why the ADU Building Process Matters More Than Ever
The ADU building process has become one of the most strategic investments homeowners can make in today’s housing market. With California’s housing crisis driving up costs and regulatory changes making accessory dwelling units easier to build, understanding this process is essential for maximizing your property’s potential.
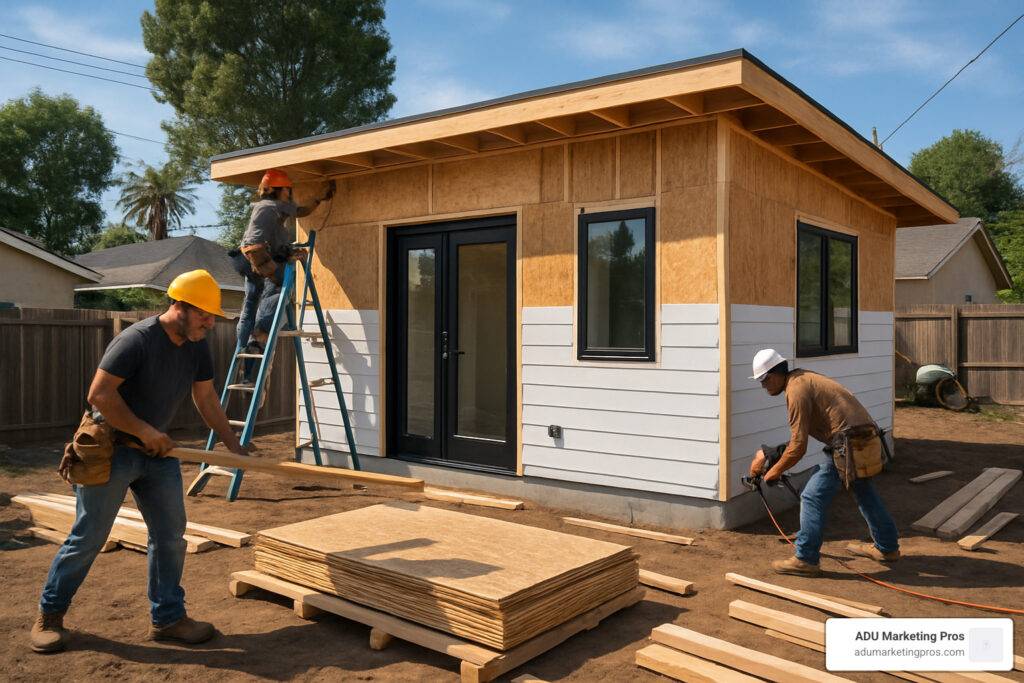
The ADU building process typically follows these key phases:
- Feasibility Assessment – Evaluate zoning, setbacks, and utility capacity
- Design & Planning – Create architectural plans and secure permits
- Site Preparation – Clear land and prepare foundation
- Construction – Foundation, framing, MEP systems, and finishes
- Inspection & Occupancy – Final inspections and certificate approval
The process generally takes 8-15 months from initial planning to move-in, with costs ranging from $300-600 per square foot depending on your chosen ADU type and local requirements.
Whether you’re looking to house aging parents, generate rental income, or simply add value to your property, the ADU building process offers a proven path to addressing multiple housing needs. Recent research shows that ADUs can increase property values while providing reliable secondary income through rentals.
The success of your ADU project depends heavily on understanding each phase before you begin. From navigating California’s Title 24 energy requirements to coordinating inspections at critical milestones, small oversights can lead to costly delays and budget overruns.

ADU building process terms to remember:
The Essentials: What Is an ADU & Why Build One?
An Accessory Dwelling Unit is a complete, self-contained living space that sits on the same property as your main home. It includes everything a regular home has – kitchen, bathroom, sleeping area, and living space – just in a smaller, more efficient package.
ADUs go by many names: granny flats, in-law suites, backyard cottages, or secondary units. What makes them special is that they’re legitimate, independent living spaces that maximize land you already own instead of requiring a second property purchase.
Key Purposes & Benefits
Family suites solve the closeness-versus-privacy puzzle beautifully. When aging parents need support but want independence, an ADU lets them stay close while maintaining their own space. Everyone gets their own front door, but help is just steps away.
Passive income from ADUs can be a real game-changer. Depending on location and size, you could see monthly rental income from $1,500 to $4,000 or more. Many homeowners find their ADU rental income covers most or all of their main house mortgage payment.
Aging-in-place strategies become more flexible with an ADU. As you get older, you might move into your ADU while renting out the main house, providing both income and a more manageable living situation in your familiar neighborhood.
Market & Regulatory Momentum
California’s housing crisis has created unexpected support: government officials actually want to make it easier to build ADUs. State laws now prevent local governments from creating excessive roadblocks, and many cities have streamlined permitting processes.
Recent changes have removed traditional barriers. Parking requirements get waived near public transit. Setback requirements have been reduced. Permit processing happens faster than before. Even HOAs face new limits on blocking ADU projects under AB 670.
The ADU building process has become more predictable and manageable thanks to these regulatory improvements, changing what used to be a maze of conflicting rules into a clearer path forward.
Choosing the Right ADU Type for Your Property

Choosing the right ADU type is crucial because the ADU building process varies dramatically depending on your selection. Here are your main options:
Detached ADUs are standalone structures offering maximum privacy and highest rental income potential. They typically cost $200,000-$400,000 and take 12-15 months to complete, but often provide the best return on investment.
Attached ADUs share a wall with your main house, cutting construction costs while providing reasonable privacy. These typically cost $150,000-$300,000 and finish in 8-12 months.
Garage conversions offer the most budget-friendly entry at $120,000-$180,000, typically completing within 6-9 months. The trade-off is losing parking and storage space.
Interior JADUs (Junior ADUs) convert existing interior space into small units sharing some utilities. They’re the most affordable at $50,000-$100,000 but offer limited privacy and rental potential.
Pros & Cons Snapshot
| ADU Type | Construction Cost | Timeline | Privacy Level | Rental Income Potential |
|---|---|---|---|---|
| Detached | $200K-$400K | 12-15 months | Highest | $2,000-$4,000/month |
| Attached | $150K-$300K | 8-12 months | High | $1,500-$3,000/month |
| Garage Conversion | $120K-$180K | 6-9 months | Medium | $1,200-$2,500/month |
| Interior JADU | $50K-$100K | 3-6 months | Low | $800-$1,500/month |
Consider your property’s footprint and privacy needs carefully. A detached ADU might sound appealing, but if it leaves you with minimal backyard space, you might regret that choice later.
Design Resources & Inspiration
Modern ADU design maximizes every square foot through open floor plans, built-in storage solutions, and multipurpose furniture. Accessibility features like wider doorways and zero-step entries increase long-term value and rental appeal.
If you’re feeling overwhelmed by design choices, Custom ADU Blueprints can help you visualize possibilities for your specific property while avoiding costly mistakes.
Navigating Rules & Financing Before You Break Ground
Getting rules and financing figured out before construction prevents months of headaches later. California’s ADU laws provide a solid foundation, but your local city or county adds specific requirements that really matter for your project.
Zoning compliance starts with understanding setback requirements – typically 4-10 feet from property lines. Utility capacity is crucial; your existing systems need to handle the extra load, sometimes requiring $10,000-$30,000 in upgrades.
Title 24 energy compliance is non-negotiable, requiring specific insulation levels, efficient lighting, and properly sized HVAC systems. Permit fees vary wildly – some cities charge $15,000+, while others have reduced fees to encourage ADU development.
Feasibility Checklist
Before falling in love with any design, verify these essentials:
- Parcel surveys confirm exact property boundaries
- Soil conditions may require professional testing
- Utility capacity assessment for electrical, water, and sewer
- Fire access requirements for emergency vehicles
- Setback compliance with precise measurements
Budget & Cost Drivers
Hard costs cover actual construction, while soft costs include permits, design fees, and inspections – typically 15-20% of total budget. Plan for a 10-15% contingency fund for unexpected issues.
Site preparation, foundation type, and utility connections significantly impact budgets. Finishes give you the most cost control – basic fixtures keep expenses reasonable while high-end selections can double interior costs.
Funding Your Vision
Home equity lines of credit remain most popular, letting you draw funds as needed during construction. Home equity lines of credit avoid paying interest on unused funds.
Cash-out refinancing works well if you can secure lower interest rates. Construction loans offer another path but require more documentation. California’s CalHFA program provides up to $40,000 in grants for qualifying homeowners.
Check out our guide on ADU Permits California for jurisdiction-specific information.
ADU Building Process: Step-by-Step Roadmap From Idea to Occupancy

The ADU building process follows a predictable path that becomes manageable once you understand each milestone. Construction represents only about half the total timeline – planning, permitting, and inspections take significant time but prevent costly mistakes.
Goals & Budget Planning
Before choosing any design, assess your primary goals. Are you focused on rental income, housing family members, or future downsizing? These decisions impact every choice from layout efficiency to finish quality.
ROI analysis must factor in property tax increases, insurance adjustments, and maintenance costs beyond simple construction costs versus rental income. Your contingency fund of 10-15% transforms potential disasters into manageable adjustments.
Feasibility Assessment
Site measurements need professional precision because small errors require expensive design changes. Utility assessments often reveal the biggest surprises – electrical panel upgrades, water pressure issues, or sewer connection needs.
Fire access requirements can be deal-breakers if not addressed early. Some areas require emergency vehicle access within 150 feet of all structures.
Design & Permitting
Architectural drawings must balance your vision with legal requirements and budget constraints. Structural engineering ensures seismic compliance and typically adds $3,000-$8,000 but prevents catastrophic problems.
Title 24 compliance affects everything from window placement to insulation levels. Plan submittal to building and safety departments typically takes 30-60 days, with most plans requiring revisions.
Construction Phases
Site preparation makes your project visible and establishes proper drainage. Foundation choice depends on site conditions – slab-on-grade works for level sites while slopes may require raised foundations.
MEP systems (mechanical, electrical, plumbing) require careful coordination before walls close up. MEP system basics must be completed during rough-in phases.
Interior finishes include drywall, flooring, and fixtures. Final inspection covers all systems and safety requirements before Certificate of Occupancy approval.

Maximizing Value & Avoiding Pitfalls
Success in the ADU building process comes down to smart planning and avoiding common mistakes. Design efficiency creates layouts that feel open and functional despite limited square footage through strategic window placement and built-in storage solutions.
Energy efficiency investments like high-performance windows and proper insulation pay back monthly through lower utility bills. Universal design features expand your tenant pool and future-proof your investment.
Contractor Vetting & Agreements
Not all contractors understand ADU-specific challenges. Verify licensing through licensed contractor lookup and ask for references from recent ADU projects. Ensure insurance coverage includes both general liability and workers’ compensation.
Contract terms should detail materials, timelines, and payment schedules. Lien waivers protect you from subcontractor payment disputes even when you pay your general contractor.
Common Mistakes & How to Dodge Them
Under-budgeting tops the mistake list. Add 15-20% to initial estimates and maintain separate contingency funds. Permit oversights can shut down projects – work with experienced professionals who understand local requirements.
Change orders during construction quickly inflate budgets. Finalize all selections before construction begins. Schedule delays often result from poor trade coordination – experienced contractors manage these complex schedules better.
For contractors looking to improve their ADU business, our ADU Builder Marketing Strategy helps grow revenue by focusing on expertise rather than competing solely on price.
Frequently Asked Questions about the ADU Building Process
What does an ADU typically cost and why?
ADU costs vary dramatically based on multiple factors. Garage conversions typically start around $120,000-$180,000, while new detached ADUs range from $200,000-$400,000 or more.
Size affects per-square-foot costs, but bigger isn’t always more expensive proportionally. Site conditions like slopes or poor soil can require expensive solutions. Utility upgrades often surprise homeowners – electrical panel upgrades alone cost $3,000-$8,000.
Finish level decisions dramatically impact costs. Basic kitchens might cost $15,000 while premium setups reach $40,000. These selections can swing budgets by $30,000-$50,000.
How long will my ADU build really take?
Design and permitting typically takes 3-6 months, though timelines vary by jurisdiction workload and plan complexity. Construction usually requires 4-8 months depending on ADU type.
Total timeline from design to occupancy typically ranges 8-15 months. Weather conditions, material availability, and inspection scheduling all affect timelines beyond contractor control.
Will my property taxes increase after completion?
Yes, but increases are usually smaller than expected. Your ADU gets assessed at current market rates, but existing property remains protected by Proposition 13’s 2% annual limit.
Tax increases typically represent 1-1.5% of construction cost annually. A $250,000 ADU might increase taxes by $2,500-$3,750 yearly. Consider this alongside rental income potential of $24,000-$36,000 annually – most ADUs provide positive cash flow even after tax increases and maintenance costs.
Conclusion
The ADU building process represents far more than adding square footage – it’s about creating possibilities for housing family, generating income, or increasing property value. California’s regulatory momentum supports homeowners who understand how to steer this process effectively.
What separates successful ADU projects from stressful experiences? Understanding the process before jumping in. Homeowners who research zoning requirements, realistic budgets, and construction timelines before breaking ground consistently report better outcomes.
The key is starting with the right knowledge foundation. From choosing appropriate ADU types to navigating Title 24 requirements, each decision builds on previous ones. Small early mistakes can become expensive problems later.
At ADU Marketing Pros, we’ve seen how experienced professionals transform potentially stressful projects into exciting journeys. We specialize in connecting homeowners with knowledgeable ADU builders and architects who understand California’s unique market challenges.
Ready to explore your options? Our More info about Pre-Approved ADU Plans can help you visualize possibilities for your specific property while streamlining the permitting process.
With realistic planning, proper budgeting, and experienced guidance, your ADU project can exceed expectations while providing value for decades to come. Your property has untapped potential. The ADU building process is simply the roadmap to open up it.