Why Plumbing for ADU Projects Deserves More Attention Than Most Homeowners Give It
Plumbing for ADU projects is one of the most complex — and most underestimated — parts of building an accessory dwelling unit. While homeowners often spend weeks agonizing over tile patterns, cabinet finishes, and floor plans, the “veins and arteries” of the home are frequently treated as a secondary concern. However, getting the plumbing wrong is not just a minor inconvenience; it is a structural and financial catastrophe. Get it right, and your ADU works smoothly for decades, providing a seamless living experience for tenants or family members. Get it wrong, and you’re looking at failed inspections, massive budget overruns, and the nightmare of tearing out brand-new flooring to fix a leaking pipe or a poorly sloped sewer line.
In the context of California’s housing crisis, ADUs have become a vital tool for increasing density. But because these units are often squeezed into existing backyards or converted from old garages, the plumbing infrastructure must be engineered with surgical precision. You aren’t just adding a bathroom; you are integrating a new hydraulic system into an existing, often aging, residential network.
Here’s a comprehensive overview of what ADU plumbing actually involves at every stage of the construction lifecycle:
| ADU Plumbing Stage | What It Covers | Critical Considerations |
|---|---|---|
| Permits & Planning | Local building codes, California Plumbing Code compliance, fee waivers | Zoning setbacks, utility easements, and impact fee thresholds. |
| Sewer Connection | Gravity flow, slope calculation, cleanout location, ejector pumps | Determining if you can tap into the existing lateral or need a new city main connection. |
| Water Supply | Meter sizing, fixture unit counts, lateral upgrades, pressure checks | Calculating the total load of the primary house plus the ADU to avoid pressure drops. |
| Rough-In Plumbing | Drain, waste & vent systems, supply lines, slab work | The installation of all pipes inside walls and under floors before they are sealed. |
| Final Fixtures | Toilets, sinks, water heaters, low-flow fixtures, backflow prevention | Ensuring all finishes meet CALGreen standards for water efficiency. |
Plumbing typically represents 15–20% of your total ADU construction budget — anywhere from $8,000 to $35,000 depending on your ADU type, location, and site conditions. This percentage might seem high until you consider the labor-intensive nature of trenching, the cost of high-grade materials like copper or PEX-a, and the specialized expertise required to navigate the California Plumbing Code (CPC). Yet many builders and homeowners treat it as an afterthought until the trenching crew shows up and discovers a massive tree root or an undocumented utility line.
The reality is that decisions made early — like where to position your bathroom relative to the kitchen, or whether your sewer line has enough elevation drop for gravity flow — can save or cost you thousands of dollars. For instance, a “wet wall” design, where the kitchen and bathroom share a single plumbing wall, can reduce material costs by 30%. Conversely, placing a bathroom on the opposite side of the unit from the sewer exit can necessitate expensive sewage ejector pumps and additional trenching.
This guide breaks down every major ADU plumbing decision you’ll face, from sewer connections and water meter upgrades to gas lines and California-specific code requirements. Whether you are planning a Garage ADU plans project or a detached custom build, understanding these technical nuances is the first step toward a successful project.

Plumbing for ADU vocabulary and related resources:
Navigating Sewer Connections and the “Line of Influence”
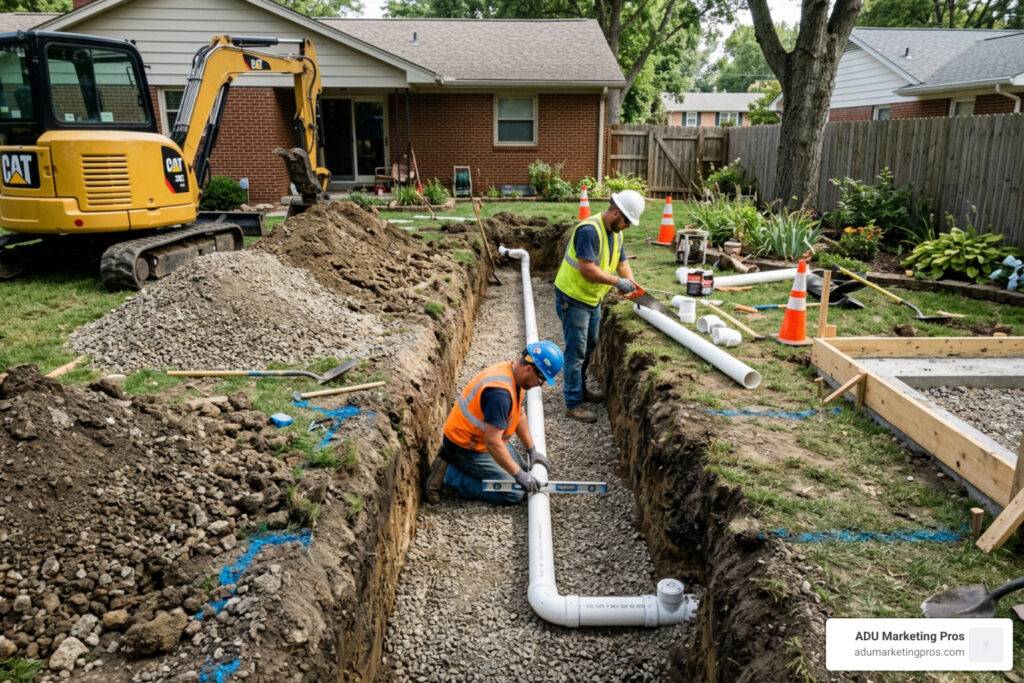
When we talk about Plumbing for ADU units, the sewer connection is often the most expensive and technically demanding phase. Unlike water lines which are pressurized and can be run with relative flexibility, sewer lines rely on the simple, unyielding law of gravity. If the waste doesn’t flow downhill at the correct angle, the system fails. This fundamental physics requirement dictates much of your ADU’s placement on the lot.
To start, you must decide where to connect. Most homeowners choose between connecting to the existing main house lateral or installing a new sewer lateral that goes directly to the city main. While connecting to the existing lateral is common for a Garage Conversion to ADU, detached units located far from the primary residence often require a completely new line. In some municipalities, if the existing lateral is older (clay or cast iron), the city may mandate a full replacement of the line all the way to the street as a condition of your permit.
Locating Your Lines and the Importance of Inspection
Before a single shovel hits the dirt, we need to know exactly where your existing pipes are. You can usually find the sewer cleanout near the foundation of your main house, but this doesn’t tell the whole story. Pipes can shift, crack, or be diverted over decades. For a foolproof plan, we highly recommend a professional sewer camera inspection. This costs between $150 and $350 but prevents the nightmare of digging up your yard only to find a collapsed or root-infested pipe that can’t handle the extra load of a second dwelling. A camera inspection provides a digital recording of the pipe’s interior, allowing engineers to verify the structural integrity and the exact depth of the connection point.

The “Line of Influence” and Soil Stability
In cities like San Diego and Los Angeles, engineers look closely at the “Line of Influence.” This is an imaginary 45-degree angle drawn downward from the ADU’s footing. If your new ADU structure sits too close to an existing sewer main, the weight of the building could crush the pipe or cause the soil to shift, leading to a catastrophic failure of the city’s infrastructure.
If your ADU falls within this line, you might be forced to deepen your footings (sometimes by several feet) or relocate the unit entirely. This is especially critical in areas with clay-heavy soil, which expands and contracts with moisture levels, putting additional stress on underground utilities. In Sacramento, for instance, this soil type can drive trenching costs up to $100 per linear foot because of the need for specialized shoring and backfilling. Understanding California ADU Requirements regarding these setbacks is essential for a smooth permit process. For more general information on how these units fit into urban planning, you can explore this Accessory Dwelling Units (ADUs) overview.
Technical Requirements for Plumbing for ADU in California
All Plumbing for ADU work must strictly adhere to the California Plumbing Code (CPC). One of the most common stumbling blocks is Section 703.2, which dictates fixture unit limits. You cannot simply “T-in” to the back cleanout of the main house if the combined waste from both units exceeds the pipe’s capacity. Most residential laterals are 4 inches in diameter, which can typically handle the load, but if your main house is already a multi-unit structure, you may hit a bottleneck.
Key technical mandates include:
- Venting: Every fixture needs proper air flow to prevent siphoning water out of traps. Without a vent, the vacuum created by rushing water will suck the water out of your P-traps, allowing sewer gases to enter the living space.
- Backflow Prevention: Mandatory devices that ensure sewage doesn’t flow backward into your ADU during a city-wide backup or heavy rain event. This is particularly vital for ADUs built at a lower elevation than the street.
- Materials: Use Schedule 40 PVC for most drainage, secured with proper wye fittings and rubber couplings to allow for slight soil movement. ABS is also common in California, but PVC is often preferred for its superior chemical resistance and strength.
- Permit Inspections: You will need at least two major inspections—one for the “rough-in” (before the pipes are covered by concrete or drywall) and a final inspection once fixtures are installed. You can learn more about the ADU Permits California process to ensure you’re prepared for these milestones.
Gravity vs. Pressure: Mastering ADU Drainage Systems
The gold standard for Plumbing for ADU drainage is a gravity-fed system. It’s silent, requires no electricity, and has fewer moving parts to break. In a gravity system, the waste moves simply because the pipe is tilted. To work effectively, the pipe must have a minimum “fall” or slope of 1/4 inch per foot of run. This might sound like a small amount, but over long distances, it adds up quickly.
For example, if your ADU is 60 feet away from the connection point, the pipe at the ADU must be at least 15 inches higher than the connection point (60 ft x 0.25 in). If your property is flat or the ADU is situated in a “bowl” lower than the main sewer line, gravity won’t be your friend. In these cases, you cannot simply dig deeper, as you eventually run into the city’s main line depth limits. This is where hydraulic engineering becomes a necessity.
When Gravity Fails: Sewage Ejector Pumps
If you can’t achieve that 1/4 inch slope, you’ll need a sewage ejector pump. This system involves a sealed, gas-tight basin buried in the ground (usually outside the ADU or in a mechanical closet) that collects all the waste from the unit. Once the basin reaches a certain level, a float switch activates a heavy-duty pump that “ejects” the waste uphill through a pressurized pipe to the main sewer line.
| Feature | Gravity-Fed System | Sewage Ejector Pump System |
|---|---|---|
| Power Source | None (Gravity) | Electricity required (needs a dedicated circuit) |
| Maintenance | Low (Occasional cleaning) | Moderate (Pump service every 3-5 years) |
| Cost | Lower (if terrain allows) | Higher (Approx. $5,000 – $8,000 extra) |
| Reliability | High | Subject to power outages (requires battery backup) |
For high-performance options, many of our clients look toward the Sanibest Pro or the Sanicubic range for high volume. These macerating pumps are a step above standard ejectors; they use stainless steel blades to grind waste (including accidental wipes or feminine products) into a fine slurry before pumping it. This allows the waste to be moved through much smaller diameter pipes (often just 1 inch), which can be easier to install in tight spaces. These systems can pump waste up to 25 feet vertically or 150 feet horizontally, making them ideal for basement ADUs or units built on steep hillsides. The Sanipit is another excellent choice for “rough-in” plumbing where you need a reliable lift station that fits into a standard 24-inch pit, providing a clean, professional look that is easy for plumbers to service.
The Importance of Proper Venting in ADU Plumbing
Regardless of whether you use gravity or a pump, venting is the most misunderstood part of the drainage system. Every plumbing fixture must be connected to a vent pipe that exits through the roof. This pipe introduces air into the system, allowing water to flow smoothly—much like putting a hole in the top of a juice can helps it pour faster. In ADUs, where space is at a premium, plumbers often use Air Admittance Valves (AAVs) or “Studor Vents” to save space, but these are not legal in all California jurisdictions. Always check with your local building department before substituting a traditional roof vent for an AAV.
Water Supply and Fixture Unit Calculations
Connecting your ADU to the water supply is about more than just running a hose from the main house. In the San Francisco Bay Area, Los Angeles, and San Diego, water utilities are incredibly strict about “fixture unit counts.” This is a mathematical way of ensuring that the water pressure in your neighborhood doesn’t drop to a trickle when everyone takes a shower at the same time.
The Water Meter Data Card and Sizing
Every sink, toilet, dishwasher, and shower is assigned a “fixture unit” value based on its potential water demand. For example, a standard bathroom group (toilet, sink, shower) might be 6 units, while a kitchen sink is 2 units. A standard 3/4-inch water meter can typically handle up to 42 fixture units. If your main house already has 35 units and your new ADU adds 12 more, you’ve exceeded the limit.
This triggers a mandatory water meter upgrade. Upgrading a water meter and the “lateral” (the pipe from the street to your house) can be a shocking expense, often ranging from $20,000 to $30,000 because it involves cutting into the city street and paying high connection fees. To avoid this, we use a Water Meter Data Card during the design phase to calculate exactly what your load will be. Sometimes, by choosing ultra-low-flow fixtures, we can keep the total count under the 42-unit threshold and save the homeowner tens of thousands of dollars.
Monitoring, Efficiency, and Sub-metering
While California law (specifically SB 7) often prevents cities from requiring separate city-owned meters for ADUs to keep construction costs down, many of our clients choose to install a WiFi enabled water meter or a private sub-meter. This is a smart move for landlords. It allows you to monitor usage in real-time and bill tenants accurately for their actual consumption without the massive upfront cost of a city-installed separate meter. It also helps detect leaks early—a running toilet in an ADU can waste hundreds of gallons a day, and a smart meter will alert your phone immediately.
For the internal piping of the ADU, we generally recommend two main materials:
- PEX Manifold Systems: PEX (cross-linked polyethylene) is the modern standard. It is flexible, which makes it easier to snake through the tight framing of an ADU. A manifold system acts like a circuit breaker box for your water; every fixture has its own dedicated line, allowing you to shut off water to the kitchen sink without affecting the bathroom.
- Copper: Still the king of durability, lasting 50-70 years. It is naturally antimicrobial and won’t degrade under UV light, but it comes with a significantly higher material and labor cost because every joint must be soldered.
- CALGreen Compliance: You must use low-flow fixtures to meet California’s strict water efficiency standards. This currently means 1.28 gallons per flush (GPF) for toilets and 1.8 gallons per minute (GPM) for showerheads. High-efficiency fixtures have improved significantly in recent years, providing a strong “spray” feel while using much less water.
Understanding the Cost of Plumbing for ADU Projects
Budgeting for Plumbing for ADU construction requires looking at two distinct phases: Rough-in and Final Plumbing. Many homeowners make the mistake of only looking at the cost of the fixtures (the “pretty” parts) and forgetting the massive amount of labor and material hidden behind the walls.
- Rough-in ($5,000 – $25,000): This is the heavy lifting. It includes trenching through your yard, laying underground pipes, slab work (cutting and removing concrete in a garage), and installing the “bones” of the system inside the walls. If you have to trench 100 feet through solid rock or clay, this cost will skyrocket.
- Final Plumbing ($1,500 – $10,000): This covers the installation of the actual toilets, sinks, faucets, and water heaters. It also includes the final “trim” work where the plumber ensures everything is watertight and functioning according to code.
Cost Breakdown by ADU Type
The type of ADU you build significantly impacts your ADU Construction Costs.
- Detached ADUs: These are the most expensive because they require entirely new utility runs across your yard. You are essentially building a small house from scratch. In the ADU Cost Bay Area, plumbing for a detached unit averages $15,000 to $35,000 due to high labor rates and complex permitting.
- Attached ADUs: Since they share a wall with the main house, you can often tap into existing lines more easily. This can bring costs down to $11,000 – $30,000, though you must ensure the existing lines can handle the added pressure.
- Junior ADUs (JADUs): Typically the most affordable ($3,000 – $15,000), especially if they share a bathroom with the main house or are part of a simple Garage Conversion ADU project where the plumbing is already nearby.
The 750 Square Foot Rule and Impact Fees
One piece of good news for your ADU Building Costs is California’s SB 13. This law waives “impact fees” for ADUs under 750 square feet. Impact fees are charges that cities levy to pay for the increased burden on the sewer and water systems. For larger units, these fees are capped and must be proportional to the size of the primary house, but they can still add thousands to your bill. In Santa Cruz, for example, the average plumbing installation is about $15,750, but homeowners often save significant sums by staying under that 750 sq ft threshold.
Cost-Saving Tips for Plumbing for ADU
We always advise our clients that strategic design is the best way to save money.
- Back-to-Back Wet Walls: Position the kitchen on the opposite side of the bathroom wall. This allows them to share the same “wet wall,” drastically reducing the amount of piping and venting needed.
- Minimize Slab Cutting: In a garage conversion, every foot of concrete you have to cut for a drain line adds labor and cost. Keep your fixtures close to where the main sewer line enters the building to minimize the “scarring” of the garage floor.
- Material Selection: PEX piping is roughly 30% cheaper than copper and performs exceptionally well in the California climate because it can expand slightly if there is a rare freeze, whereas copper will burst.
- DIY Final Installation: While we strongly suggest hiring a licensed pro for the rough-in (to ensure it passes the high-stakes city inspection), a handy homeowner can often install the final sinks and toilets to save on labor costs.
- Permit-Ready Designs: Using pre-approved plans from your city can speed up the process and ensure your plumbing layout is already optimized for code, reducing the back-and-forth with the building department.
If you’re looking at how to fund these costs, check out various ADU Financing Options available to California homeowners, including HELOCs and specialized ADU construction loans.
Gas Lines vs. All-Electric: Future-Proofing Your ADU
The debate between gas and electric is no longer just about cooking preference—it’s about navigating a rapidly changing regulatory landscape and considering the long-term value of your property.
The CPUC Ruling and the “2-to-1 Ratio”
A major shift occurred with the CPUC Ruling D.23-12-037, which eliminated subsidies for gas line extensions in new construction. Historically, utility companies would cover some of the cost of running a new gas line to a home. Now, if you want gas in your ADU, you’re paying the full freight for the line extension, which can add $5,000 to $10,000 to your budget before you even buy a stove.
Furthermore, utilities like SDGE have a “2-to-1 ratio rule” mentioned in their SDGE standards guide. This rule relates to the distance and pressure requirements for running new lines parallel to existing ones. In many tight California backyards, this rule can limit how you run a new line, sometimes making a gas connection physically impossible or prohibitively expensive due to the need for specialized trenching and shielding.
Why All-Electric is Winning the ADU Race
Most modern Plumbing for ADU designs are moving toward all-electric for several compelling reasons:
- Incentives and Rebates: California offers significant rebates (sometimes up to $4,000) for building all-electric ADUs. These programs are designed to help the state meet its decarbonization goals and can offset the cost of high-end electric appliances.
- Heat Pump Water Heaters: These are the “secret weapon” of modern ADUs. They are 3-4 times more efficient than traditional electric water heaters and are the preferred choice for Title 24 energy compliance. They work by moving heat from the air into the water, rather than creating heat from scratch.
- Lower Infrastructure Cost: By going all-electric, you completely avoid the cost of a separate gas meter, gas piping, and the associated trenching. This simplifies the construction process and reduces the number of trades you need to manage.
- Safety and Air Quality: Eliminating gas removes the risk of carbon monoxide leaks and the need for complex venting required by gas tankless heaters. It also improves indoor air quality, which is a major selling point for modern tenants.
If you are absolutely set on gas (perhaps for a professional-grade range), remember that propane tanks are an alternative, but they must be at least 10 feet from any habitable structure and property line, which is a significant challenge on small California lots. For most, the future of the ADU is electric.
Frequently Asked Questions
Common Questions about Plumbing for ADU
Can I connect my ADU to the main house cleanout? Technically, no. While you can connect to the line that the cleanout serves, you cannot simply pipe into the cleanout itself. Most California codes require a dedicated connection point with its own cleanout to ensure that a blockage in the ADU doesn’t overflow into the main house (and vice versa). The cleanout must remain accessible for maintenance and cannot be buried under the ADU’s foundation.
How do I calculate the required sewer pipe slope? The standard is a 1/4 inch drop for every 1 foot of horizontal distance. If your pipe run is 20 feet, the end of the pipe must be 5 inches lower than the start. If you have less than an 1/8 inch per foot, the “solids” in the waste will settle while the liquids flow past, leading to constant, stubborn clogs that require professional snaking.
When is a water meter upgrade mandatory? An upgrade is mandatory when your total “fixture unit count” (Main House + ADU) exceeds the capacity of your current meter. For a standard 3/4″ meter, the limit is usually 42 units. If you are adding a full kitchen, laundry, and two bathrooms to a property that already has a 3-bedroom main house, you are almost certainly going to need an upgrade. Always have your plumber perform a “fixture unit audit” before submitting plans to the city.
What is a greywater system, and should I install one in my ADU? A greywater system diverts water from sinks and showers (not toilets) to be used for landscape irrigation. While environmentally friendly, they add significant complexity to the plumbing layout because you must keep the “grey” and “black” water lines separate until they exit the building. In California, this can help with LEED certification but may not provide a quick financial ROI unless you have a large garden to maintain.
Do I need a separate water heater for my ADU? In almost all cases, yes. Running hot water from the main house to a detached ADU is inefficient; the water will lose significant heat in the underground pipes, and it takes a long time to reach the tap. A dedicated tankless electric water heater or a small heat pump water heater inside the ADU is the standard solution.
Conclusion
Building an ADU is a marathon, not a sprint, and the plumbing is the part of the race where many people trip. However, by understanding the “Line of Influence,” calculating your fixture units early, and choosing the right drainage system, you can ensure your project stays on track and under budget. Plumbing is the foundation of a comfortable home; it is the one system you truly cannot live without, and it deserves the highest level of professional attention during the design phase.
Investing in high-quality Plumbing for ADU work isn’t just about following rules—it’s about protecting your property value and ensuring long-term peace of mind. A well-designed system with modern, water-saving fixtures, a reliable water heater, and properly sloped lines will serve your family or your tenants for decades to come. It also makes the property much easier to sell in the future, as savvy buyers will always look for permitted, high-quality utility work.
At ADU Marketing Pros, we specialize in helping construction and architecture firms showcase this kind of technical expertise to their clients. If you’re looking for More info about ADU garage conversions or need help navigating the complex world of California ADU regulations, we are here to help. Don’t let your project get soaked—plan your plumbing with precision from day one and build a unit that stands the test of time.