
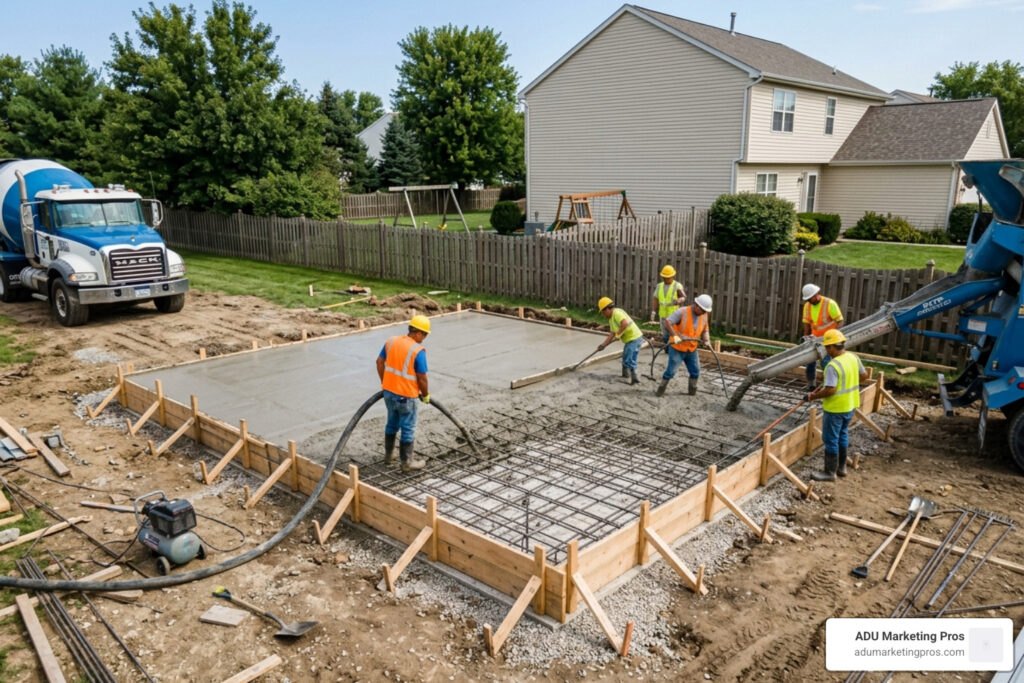
Why Garage Foundation Requirements Determine Whether Your Build Lasts or Fails
Garage foundation requirements are the structural, code, and material standards that every garage build must meet to be safe, legal, and long-lasting. When we discuss these requirements, we aren’t just talking about a simple slab of concrete; we are talking about the complex engineering that prevents a multi-ton structure from sinking into the earth or cracking under the weight of vehicles and storage. In the construction industry, the foundation is often referred to as the “silent partner” of the building—when it works, nobody notices it, but when it fails, the entire project becomes a liability.
Here’s a quick summary of what most jurisdictions require for a standard residential garage:
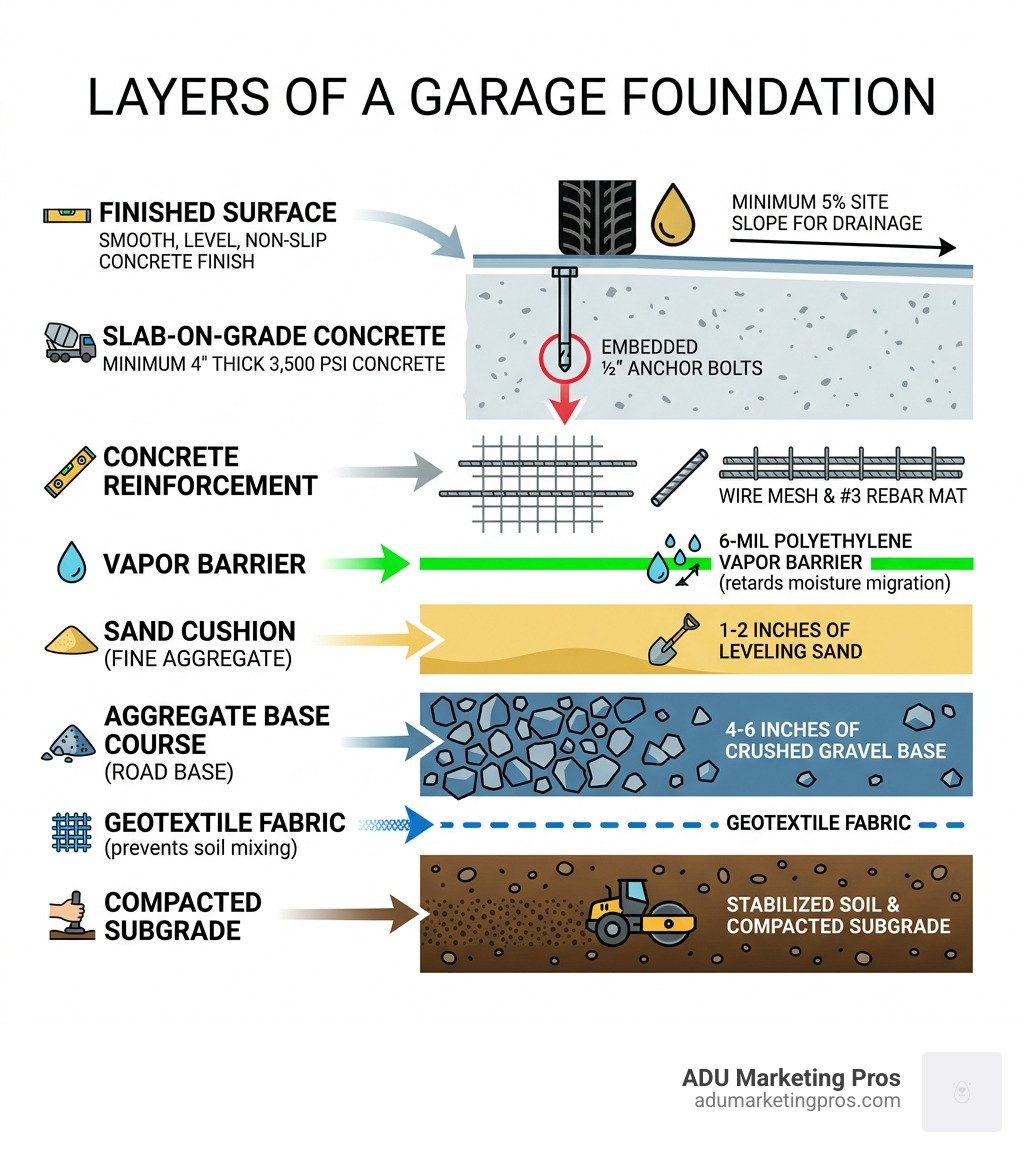
- Minimum slab thickness: 3.5 to 4 inches for standard vehicles; 6 inches for heavy-duty use (3,500 PSI concrete minimum).
- Footing depth: At least 12 inches below undisturbed soil and below the local frost line to prevent frost heave.
- Footing width: Minimum 12 inches wide to distribute the load of the walls effectively.
- Reinforcement: #3 or #4 rebar on 24-inch centers, wire mesh, or macro-synthetic fiber mesh for crack control.
- Vapor barrier: 6-mil or 10-mil polyethylene sheet under the slab to prevent moisture migration.
- Site drainage: Minimum 5% slope for the first 10 feet away from the foundation to prevent hydrostatic pressure.
- Anchor bolts: ½-inch diameter, embedded 7 inches into concrete, spaced no more than 6 feet apart and within 12 inches of any joint.
- Permits: Required in virtually all US jurisdictions for garages over 200 sq ft, especially in high-seismic areas like California.
These numbers come from the International Residential Code (IRC) and are adopted — sometimes with stricter local amendments — by most states and municipalities. For instance, the 2022 California Building Standards Code introduces even more rigorous requirements for energy efficiency and seismic resilience, particularly if the garage is intended for future habitation.
Getting the foundation right isn’t just about passing inspection. A poorly built foundation leads to cracking, settling, moisture damage, and in worst cases, structural failure. For ADU firms and builders in California, the stakes are even higher: garage foundations that will be converted to habitable space face additional requirements for insulation, plumbing, and seismic performance. If you are planning a conversion, you must ensure the existing slab can handle the “change of occupancy” load, which often requires a structural engineer’s certification.
The good news? Once you understand the core requirements, the decisions become much more straightforward. Whether you are pouring a new slab for a workshop or retrofitting an old garage for a rental unit, following these standards is the only way to protect your investment.
Essential Garage foundation requirements terms:
Understanding Common Garage Foundation Types
When we talk about garage foundation requirements, the first thing we have to decide is what kind of foundation we’re actually building. Not all garages are created equal—a small detached shed-style garage has very different needs than a massive attached three-car garage that might eventually become a Garage Conversion Adu. The choice of foundation depends heavily on the local climate, the soil composition, and the intended use of the structure.
In our experience working with ADU firms across the San Francisco Bay Area and Los Angeles, we typically see four main types of foundations. Each has its own set of “must-haves” and “nice-to-haves.”
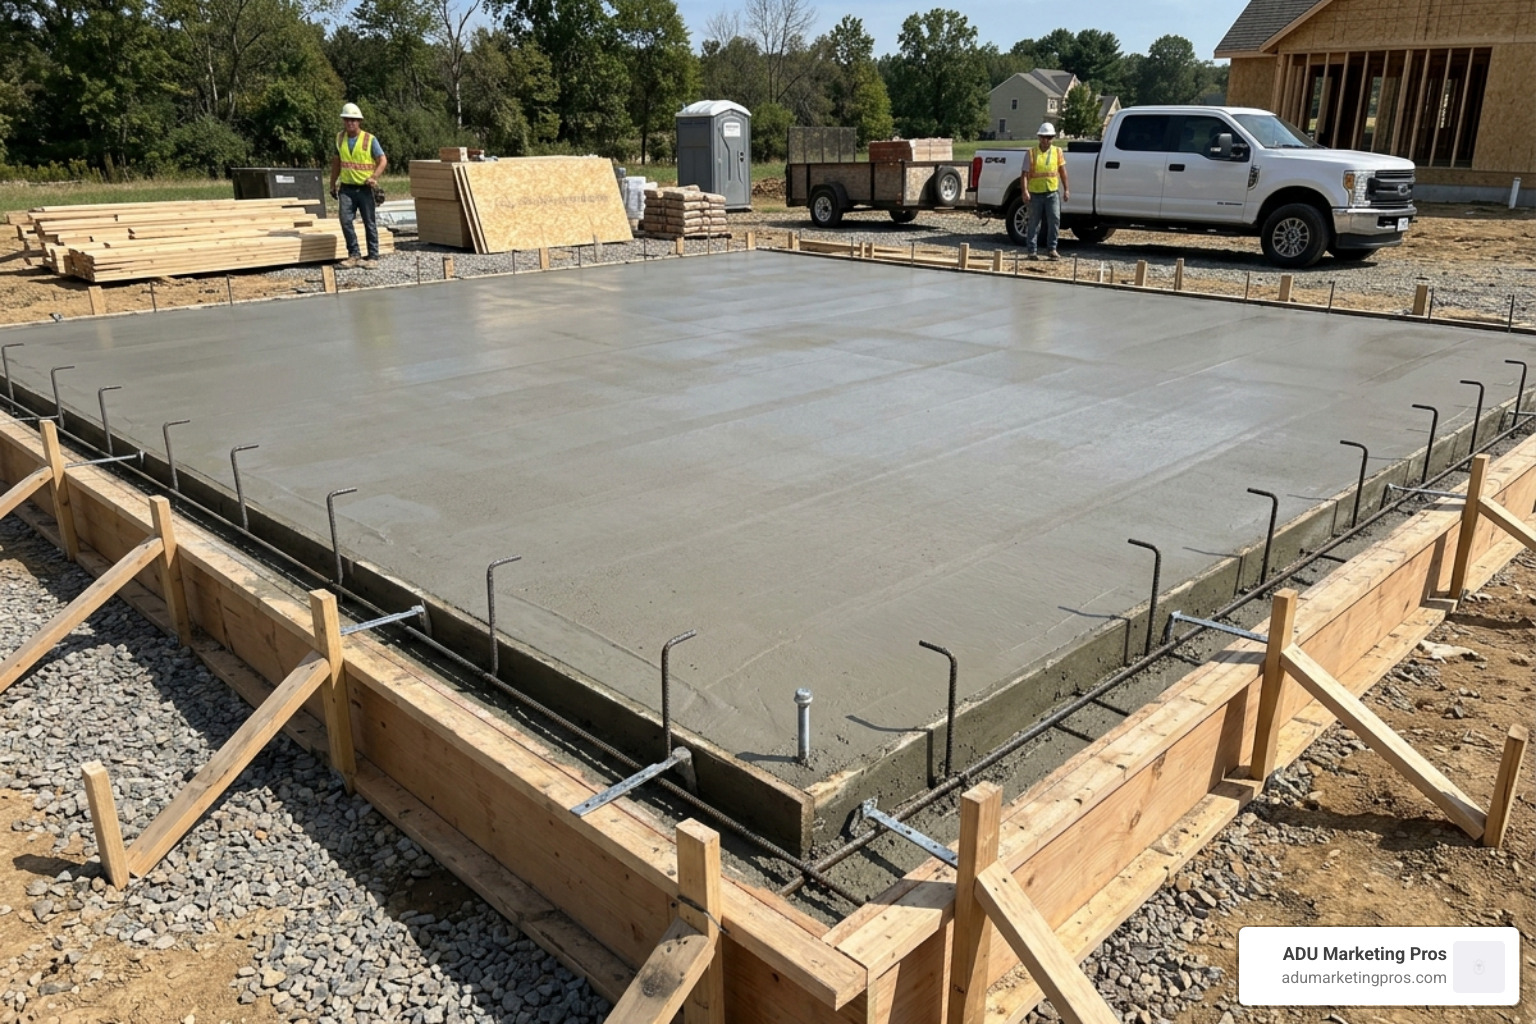
1. Slab-on-Grade (Monolithic)
This is the “all-in-one” option. The slab and the footings are poured at the same time, creating a single, continuous piece of concrete. It’s cost-effective and fast, making it a favorite for many California builders. The edges are thickened (usually to 12 inches deep and 12 inches wide) to act as the footing, which carries the weight of the walls. This type is ideal for level sites where the ground doesn’t freeze deeply. However, it requires precise site prep because any settling of the subgrade will affect the entire structure simultaneously.
2. T-Shaped Foundation
Imagine an upside-down “T.” This is the gold standard for areas where the ground freezes (though in places like San Jose or San Diego, it’s often used for larger, heavier structures). You have a footing below the frost line, a stem wall coming up, and then the slab is poured between the walls. This provides superior stability because the footings are independent of the floor slab, allowing for more complex plumbing and electrical routing under the floor before the final pour.
3. Frost-Protected Shallow Foundation (FPSF)
This uses rigid foam insulation to keep the ground under the foundation from freezing. It’s a clever way to avoid digging deep trenches in colder climates, though less common in coastal California. By trapping the earth’s natural heat and preventing it from escaping through the foundation, the FPSF keeps the soil temperature above freezing, effectively “tricking” the ground into not heaving.
4. Pier and Beam
Instead of a solid wall of concrete, the garage sits on concrete piers (posts) sunk deep into the ground. This is often the go-to for sloped sites or areas with very tricky soil, such as expansive clay or high water tables. The piers reach down to stable soil or bedrock, and a wooden or steel frame is built on top to support the garage floor and walls.
Detached Garage Foundation: Comprehensive Guide [ 2026]
| Foundation Type | Relative Cost | Best For | Key Advantage |
|---|---|---|---|
| Slab-on-Grade | Low | Level sites, mild climates | Fast installation, lower labor costs |
| T-Shaped | Medium | Large structures, cold climates | Superior stability and frost protection |
| Pier and Beam | Medium-High | Sloped sites, expansive soil | Minimal excavation, avoids soil issues |
| FPSF | Medium | Cold climates, shallow digs | Energy efficiency and reduced digging |
Monolithic vs. Floating Slabs
One of the most frequent questions we get involves the difference between a monolithic slab and a floating slab. In a monolithic pour, the slab and the perimeter footing are one single piece of concrete. This provides excellent structural integrity because there are no “cold joints” between the floor and the support. It acts as a rigid box that moves as one unit.
A floating slab, on the other hand, is technically “detached” from the footings. The perimeter footings are poured first, and the slab is poured inside them later, often with an expansion joint in between. This allows the slab to move slightly without cracking the main structure—ideal for detached garages on certain soil types where minor shifting is expected. However, if you are looking at Adu Plans With Garage, you’ll likely need a more integrated approach to meet modern California building standards, which often favor monolithic or T-shaped designs for seismic safety.
Pier Foundations for Sloped Sites
Building in the Hollywood Hills or the slopes of the East Bay? You aren’t going to have a fun time trying to level a massive concrete slab. That’s where pier foundations come in. We use caissons (deep concrete pillars) or helical piles (think giant screws) to reach stable soil or bedrock. The garage foundation requirements for these sites are much more intense. You’ll need a grade beam—a reinforced concrete beam that connects the piers and supports the garage walls. This prevents the “sliding down the hill” scenario that everyone wants to avoid and ensures the structure remains level even as the surface soil shifts over decades.
Critical Garage foundation requirements for Depth and Frost Protection
If there is one thing that keeps building inspectors up at night, it’s the depth of the footings. Even in the relatively temperate climates of Sunnyvale or Palo Alto, the garage foundation requirements for depth are non-negotiable. The depth of your footing determines how much weight the ground can support and how well the building will resist the natural movements of the earth.
The basic rule is the “12-inch rule”: footings must extend at least 12 inches below the undisturbed ground surface. But there’s a catch—they also must be below the local frost line. In most of our California service areas, the frost line isn’t a huge concern, but in mountain regions or further north, failing to get below that line leads to “frost heave.” This is a physical process where moisture in the soil freezes, expands by about 9%, and literally lifts your garage. When the ice melts, the garage drops, but never quite back into the same place, leading to massive structural cracks and jammed doors.
Local Building Codes and Garage foundation requirements
Every city has its own flavor of the code. For example, the San José Residential Code has specific requirements for how foundations must handle seismic loads. Because we are in earthquake country, our foundations aren’t just sitting there; they are bolted down with heavy-duty anchor bolts and often reinforced with extra steel to ensure the building stays attached to the ground when things start shaking. In Seismic Design Categories D and E (common in CA), you may also need “hold-downs”—specialized hardware that prevents the walls from lifting off the foundation during a major tremor.
Before you even think about ordering a concrete truck, you must have your permits in hand. Most jurisdictions require a permit for any garage over 200 square feet. This process involves submitting site plans that show your setbacks (how far the garage is from the property line) and your structural details. Inspectors will typically visit the site twice: once after the trenches are dug and rebar is set (the “pre-pour” inspection) and once after the concrete is finished.
Soil Bearing Capacity and Garage foundation requirements
You can pour the strongest concrete in the world, but if you pour it on top of “muck” or loose fill, it’s going to sink. Soil bearing capacity is measured in pounds per square foot (psf). This is the amount of pressure the soil can handle before it deforms.
Typical values we see in residential construction:
- Bedrock: 12,000 psf (The gold standard for stability)
- Sedimentary Rock: 4,000 psf
- Sandy Gravel: 3,000 psf
- Clay/Silty Clay: 1,500 psf
In many parts of the San Francisco Bay Area, we deal with “expansive clay.” This soil acts like a sponge—it swells when it’s wet and shrinks when it’s dry. This movement is the enemy of a stable foundation. To meet garage foundation requirements on these soils, we often have to over-excavate and bring in engineered fill (like crushed rock) or use extra reinforcement. Compaction is key; most codes require the soil to be compacted to 95% of its maximum density, verified by a Standard Proctor test, before the concrete is poured. If the soil is particularly poor, a geotechnical engineer may be required to design a custom foundation plan.
Concrete Specifications and Reinforcement Standards
Now let’s talk about the “mix.” Concrete isn’t just “mud.” It’s a carefully engineered material consisting of Portland cement, water, and aggregates (sand and gravel). For a standard residential garage, the International Residential Code (IRC) generally calls for a minimum compressive strength of 2,500 PSI, but for a garage floor that actually has to hold a 4,000-pound SUV or a heavy workshop bench, we always recommend 3,500 PSI.
The Importance of the Water-to-Cement Ratio
The strength of concrete is largely determined by the ratio of water to cement. Too much water makes the concrete easier to pour and level, but it significantly weakens the final product and increases the likelihood of “shrinkage cracks.” A professional mix will often include plasticizers—additives that make the concrete flow better without adding extra water. This ensures the concrete reaches its full design strength while remaining workable for the finishing crew.
Reinforcement Options: Rebar, Mesh, and Fiber
Concrete is incredibly strong when you push on it (compression), but it’s surprisingly weak when you try to pull it apart (tension). Since the ground under a garage can shift, we need reinforcement to provide that missing tensile strength.
- Rebar: Usually #3 (3/8 inch) or #4 (1/2 inch) steel bars. We typically lay these in a grid pattern on 24-inch centers. For an Adu Garage Conversions, where the floor might eventually hold heavy furniture, kitchen appliances, or even a second story, rebar is the preferred choice. It must be supported by “chairs” to ensure it stays in the middle of the slab during the pour.
- Wire Mesh: A grid of thinner steel wires (W1.4 or W2.9). It’s easier to install than rebar but can sometimes sink to the bottom of the slab during the pour if the crew isn’t careful, rendering it useless. It is best for preventing small surface cracks rather than providing structural support.
- Fiber Mesh: These are tiny synthetic or steel fibers mixed directly into the concrete at the plant. It’s great for preventing small surface cracks (crazing) and providing three-dimensional reinforcement, but it shouldn’t be the only thing holding a structural slab together in high-load areas.
Managing Cracks with Expansion Joints
Concrete will crack. It’s a fact of life. Our job is to tell the concrete where to crack. We do this with expansion joints (also called control joints). By creating a “weak” line in the slab, we encourage the crack to happen in a neat, straight line at the bottom of the groove rather than a spiderweb across your floor.
The rule of thumb is to place joints every 10 to 12 feet in both directions. These joints should be cut to a depth of at least 25% of the slab thickness. So, for a 4-inch slab, your joint should be 1 inch deep. These can be “tooled” into the wet concrete or saw-cut the next day once the concrete has hardened enough to support the saw.
Site Preparation and Moisture Management
A garage foundation is only as good as the ground it sits on. Site preparation is often the most labor-intensive part of the job, but it is where the longevity of the build is decided. We start by clearing all vegetation and “topsoil.” Topsoil is full of organic matter like roots and leaves that will rot over time, creating voids under your slab that lead to sinking and cracking.
Vapor Barriers and Waterproofing
One of the most overlooked garage foundation requirements is the vapor barrier. We’ve seen many older garages that are constantly “sweating”—the floor looks damp even when it hasn’t rained. This is caused by moisture wicking up through the concrete from the soil via capillary action. Concrete is porous; it acts like a hard sponge.
To prevent this, we lay down a 6-mil or 10-mil polyethylene vapor barrier over a bed of ¾-inch clean stone. This stone layer acts as a “capillary break,” making it much harder for water to climb up toward your slab. If you are planning a Garage Conversion To Adu, this step is mandatory to prevent mold, protect flooring like laminate or vinyl, and keep your new living space healthy. In high-end conversions, we often upgrade to a 15-mil Stego Wrap, which is nearly puncture-proof.
Effective Foundation Drainage Systems
Water is the primary enemy of your foundation. If water pools around the edges, it can exert “hydrostatic pressure,” pushing against the walls and eventually causing leaks, cracks, or even a total wall collapse. Proper drainage ensures that water is moved away from the structure as quickly as possible.
We ensure that the ground around the garage slopes away at a minimum of 5% (6 inches of drop over 10 feet). For sites with poor drainage or high water tables, we install:
- Perimeter Drains (French Drains): A perforated pipe buried in gravel at the level of the footing that carries water away to a dry well or the street.
- Gutter Discharge: Making sure your downspouts aren’t dumping water right at the base of the foundation. We recommend extending downspouts at least 5 feet away from the garage.
- Foundation Coatings: A bituminous (tar-based) or rubberized spray applied to the outside of the stem walls to keep moisture from penetrating the concrete.
- Swales: Shallow, grass-lined ditches that redirect surface runoff around the garage site during heavy California rainstorms.
Attached vs. Detached Garage Foundation Requirements
There is a major difference in garage foundation requirements when you attach a garage to an existing house versus building a standalone structure. The primary concern is “differential settlement”—the tendency for two different structures to sink or move at different rates.
When the garage is attached, it becomes part of the main structure. This means the footings must be at the same depth as the house footings to ensure they move together during soil shifts or earthquakes. If one part of the house is on a deep footing and the garage is on a shallow “floating” slab, they will pull apart, leading to massive structural damage at the connection point. You will often see this as a widening crack where the garage roof meets the house wall.
For a detached garage, the rules are often a bit more relaxed. In many jurisdictions, a detached garage can sit on a “floating slab” because if it shifts an inch, it isn’t going to tear the kitchen off your main house. However, even detached garages must meet setback requirements, which dictate how close the foundation can be to property lines, fences, and other structures.
Foundation Considerations for ADU Conversions
This is our specialty at ADU Marketing Pros. If you are looking at a Garage To Adu Conversion, the foundation you have might not be the foundation you need. Most older garages were built to “utility” standards, not “habitable” standards.
Converting a garage into a habitable space (an ADU) triggers new requirements:
- Insulation: California’s Title 24 energy standards often require rigid foam insulation (R-5 to R-10) under the slab or around the perimeter to prevent heat loss. This can be difficult to retroactively install without pouring a new “topping slab.”
- Plumbing: You’ll likely need to “trench” the existing slab to install sewer lines for a bathroom or kitchen. This involves cutting the concrete, digging the trench, laying pipe, and then patching the concrete to match the existing strength.
- Structural Upgrades: If you’re adding a second story to the garage, the existing footings almost certainly need to be “underpinned.” Underpinning involves digging under the existing footing and pouring new, wider, and deeper concrete sections to handle the extra weight.
- Seismic Retrofitting: Older slabs may lack the necessary anchor bolts to keep the walls attached during an earthquake. We often have to install “epoxy-set” bolts, where we drill into the existing concrete and glue in new steel anchors.
Check out our Adu Garage Conversion California guide for more specifics on these upgrades.
Cost Analysis: DIY vs. Professional Installation
We get it—everyone wants to save money. But the foundation is the one place where you really shouldn’t cut corners. A mistake here is permanent.
- DIY Costs: You might spend $2,000 to $4,000 on materials (concrete, rebar, gravel) and rental equipment for a standard 20×20 garage. However, the physical labor is grueling, and if you mess up the levelness or the pour “sets up” before you can finish it, the cost to jackhammer it out and start over is astronomical.
- Professional Costs: A professional crew in the San Jose or San Francisco area will typically charge between $10 and $20 per square foot for a high-quality slab and footing. For a full basement foundation or a complex pier-and-beam system, that cost can jump to $50,000 or more.
Before you decide, use our Garage Conversion Cost Calculator to see how the foundation fits into your total project budget. Investing in a professional pour often pays for itself in reduced maintenance and higher property appraisal values.
Frequently Asked Questions about Garage Foundations
How thick should a standard garage slab be?
For most residential uses, 4 inches is the standard. However, if you plan on parking a heavy RV, a boat, or using the space for a workshop with heavy machinery like a car lift, we recommend bumping that up to 6 inches with #4 rebar reinforcement. A 4-inch slab is rated for about 40 lbs per square foot of live load, while a 6-inch slab can handle significantly more.
Do I need footings for a detached garage?
In almost all cases, yes. While some very small sheds (under 120-200 sq ft depending on the city) can get away with a gravel pad or pressure-treated skids, any “garage” intended for vehicles needs at least a thickened-edge monolithic slab to meet garage foundation requirements. This prevents the walls from bowing outward under the weight of the roof.
How long does a garage foundation take to cure?
Concrete doesn’t “dry”—it cures through a chemical reaction called hydration. While you can usually walk on it after 24 to 48 hours, it takes about 7 days to reach 70% of its strength and a full 28 days to reach its design strength (like 3,500 PSI). We recommend waiting at least a full week before starting to frame walls or putting heavy vehicles on the slab. Driving on “green” concrete can cause permanent internal micro-cracking.
Can I build a garage on an existing driveway?
Generally, no. Most driveways are only 2-3 inches thick and lack the perimeter footings required to support the weight of garage walls and a roof. Building on a driveway will almost certainly lead to the structure sinking and the walls cracking within the first few years. You must cut out the driveway and pour a proper foundation.
What is the best concrete mix for a garage?
We recommend a 3,500 PSI mix with a low water-to-cement ratio. In areas with freeze-thaw cycles, you should also request “air-entrained” concrete, which contains billions of microscopic bubbles that give the concrete room to expand and contract without scaling or spalling.
Do I need a vapor barrier if I’m not living in the garage?
Yes. Even if the garage is just for cars, a vapor barrier prevents “efflorescence” (that white powdery salt that appears on concrete) and keeps your tools from rusting due to high humidity levels rising through the floor.
Conclusion
At ADU Marketing Pros, we know that the foundation is more than just a slab of concrete—it’s the literal base of your investment and the most critical component of your building’s structural integrity. Whether you are a homeowner in Mountain View planning a new workshop or a construction firm in San Diego looking to scale your ADU business, understanding garage foundation requirements is the first step toward a successful, code-compliant project.
A solid foundation ensures structural compliance, protects your long-term ROI, and prevents the “nightmare scenarios” of sinking walls and cracked floors that give construction a bad name. By following the IRC standards and local California amendments, you create a space that is safe for today and ready for whatever conversion or upgrade you might plan for tomorrow.
For More info about ADU garage conversion services, or to learn how we can help your firm grow through expert digital marketing and lead generation, reach out to us today. Let’s build something that lasts!