The ADU Revolution: California’s Answer to the Housing Crunch
ADU construction California has exploded, changing how homeowners view their property. An Accessory Dwelling Unit (ADU) is a secondary, independent living space on a property that already has a primary home. You might know them as granny flats, in-law suites, or backyard cottages.
Quick ADU Construction Overview:
- What it is: A self-contained living unit with its own kitchen, bathroom, and entrance.
- Timeline: Typically 8-12 months from design to completion.
- Key steps: Feasibility → Design → Permitting (60-day review) → Construction → Occupancy.
- Cost range: Varies by size and finishes; core costs include design, permits, site work, and construction.
- Requirements: Must meet state and local rules for size (up to 1,200 sq ft for detached), height (16-18 ft typical), and setbacks.
- Benefits: Rental income, multi-generational housing, and increased property value.
The numbers tell a remarkable story. Between 2016 and 2023, the number of ADUs permitted annually in California grew from 1,336 to 26,924—a 20-fold increase. By 2023, ADUs comprised more than 21 percent of all homes permitted statewide. This surge is most prominent in major metropolitan areas like Los Angeles, San Diego, and the San Francisco Bay Area, where housing demand is at its peak. This isn’t just a trend; it’s a fundamental shift in how California addresses its housing shortage, allowing homeowners to generate rental income, house family, and build long-term wealth.
The current ADU boom is the result of a perfect storm: progressive state legislation removing local barriers, a pressing need for more housing options, and a growing desire among homeowners for financial flexibility. This guide walks you through everything you need to know about ADU construction in California—from legal requirements to managing the build process. Whether you’re a homeowner exploring your options or a professional helping clients, you’ll find the clarity you need to move forward with confidence.

ADU construction California terms made easy:
Decoding ADUs: Types, Terms, and Key Distinctions
An Accessory Dwelling Unit (ADU) is a self-contained home on the same lot as a primary residence. To qualify, it must have its own kitchen, bathroom, and separate entrance. While you may hear terms like “granny flat,” “in-law suite,” or “casita,” they all refer to the same concept: an independent living unit on a residential property.

ADU vs. JADU: What’s the Difference?
California also allows for a Junior Accessory Dwelling Unit (JADU), which has key differences from a standard ADU:
- Size and Location: A JADU is limited to 500 square feet and must be created within the existing footprint of a single-family home, such as a converted bedroom.
- Kitchen: A JADU requires only an “efficiency kitchen” with smaller appliances (120-volt), a prep counter, and storage. A full kitchen is not necessary.
- Bathroom: A JADU is permitted to share a bathroom with the main house.
- Owner-Occupancy: While state law has removed owner-occupancy requirements for standard ADUs, local rules may still require the property owner to live in either the main home or the JADU. This is a critical distinction for investors.
JADUs are a cost-effective option for adding a smaller, integrated living space by using the home’s existing structure. They are ideal for a single occupant, such as a college student or a caregiver.
Types of ADU Construction
The versatility of ADU construction California allows for several approaches, each with its own set of pros and cons:
- Detached New Construction: A new, freestanding unit built in your backyard. This offers the most privacy and design flexibility, making it ideal for rental units. However, it is also the most expensive option due to the need for a new foundation, structure, and utility connections.
- Attached New Construction: A new unit that is built onto and shares a wall with the primary home. This can be more cost-effective than a detached unit by sharing a wall and potentially simplifying utility hookups. The trade-off is less privacy and potential noise transfer between the units.
- Conversion ADUs: Changing an existing space into a legal ADU. This is often the fastest and most affordable option because it utilizes a pre-existing structure.
- Garage Conversions: A popular choice that reuses an existing structure, simplifying permits and construction. As noted by betterplaceremodeling.com, converting existing structures is often more cost-effective. The main challenge can be creating a functional layout within the garage’s footprint and replacing lost parking or storage space.
- Basement or Interior Conversions: Turning an unfinished basement, attic, or other part of your home into an independent unit. This is an efficient use of space but can be constrained by existing ceiling heights, window access (egress), and plumbing challenges.
- Prefab and Modular Homes: These units are built off-site in a factory and then transported and assembled on your property. This method can significantly reduce on-site construction time and disruption. However, it requires clear site access for a crane and truck, and costs can escalate with transportation and site-specific preparations. It’s important to distinguish between modular homes, which meet state building codes (Title 24), and manufactured homes, which follow federal HUD standards (Title 25). Both can be used as ADUs but follow different regulatory paths.
Navigating the Legal Landscape of ADU Construction California
California has dramatically reformed its ADU laws to combat the state’s housing shortage. Since 2016, a series of state laws have removed local barriers, making it easier for homeowners to build. This legislative push, championed by housing advocates, has led to a building boom across the state.
The California Department of Housing and Community Development (HCD) oversees ADU law implementation. The HCD provides an official ADU Handbook to guide homeowners and ensures local governments comply with state regulations.
Statewide Development Standards
State law creates a baseline of rules that prevent cities from being overly restrictive. Key statewide standards include:
- Size Limits: Detached ADUs can be up to 1,200 square feet. Attached ADUs are typically limited to 50% of the primary home’s size.
- Height Restrictions: Detached ADUs are generally limited to 16 feet in height, though this can increase to 18 feet or more in certain situations (e.g., to match the roof pitch of the main home or if located near a taller primary residence).
- Setbacks: State law mandates a maximum of 4-foot side and rear yard setbacks, allowing ADUs to fit in smaller yards. No setbacks are required for conversion ADUs.
- Parking Exemptions: No parking is required for ADUs located within a half-mile of public transit, in historic districts, or for conversions of existing structures.
- Fire Safety: Fire sprinklers are not required in an ADU if the primary home does not have them, which helps control costs significantly.
The Permitting Process: The 60-Day Rule
California law streamlines ADU permitting with a ministerial approval process. If an application meets all objective zoning and building codes, the local agency must approve it without subjective review. A key part of this is the 60-day permit review timeline. Local agencies must approve or deny a complete application within 60 days; otherwise, it is “deemed approved.” Many cities, like San Jose, also offer pre-approved ADU plans to further speed up the process. After passing final inspections, the ADU receives a Certificate of Occupancy, making it a legal dwelling.
The Role of Local Ordinances
While state law sets the foundation, it’s crucial to remember that local city and county ordinances still play a role. Cities can regulate objective standards such as architectural design, exterior materials, and landscaping. They cannot, however, impose rules that unreasonably hinder ADU development. Always start by consulting your local planning department to understand the specific requirements in your area, as this can prevent costly redesigns and delays.
Key Legislative Updates You Need to Know
- AB 976 (Owner-Occupancy): As of 2024, this law prohibits cities from requiring the owner to live on the property, allowing rentals of both the ADU and the primary home.
- AB 1033 (Selling ADUs Separately): This groundbreaking law allows cities to adopt ordinances permitting an ADU to be sold separately from the primary home, similar to a condominium. This involves creating a homeowners’ association (HOA) and a formal agreement for shared elements like driveways or yards. See the details on the California Legislative Information website.
- AB 2221 (Streamlining): This bill further standardized approvals and clarified rules for converting existing structures like garages and basements.
- SB 1211 (Multi-Family Properties): Effective in 2024, this law allows owners of multi-family properties to convert non-livable spaces (like storage rooms or attics) into ADUs and build multiple detached units. More information is available at leginfo.legislature.ca.gov.
- SB 1077 (Coastal Zones): This bill aims to streamline the difficult process of building ADUs in California’s coastal zones, which often involves extra review from the Coastal Commission. Clearer guidance is expected by 2026. Details can be found at leginfo.legislature.ca.gov.
Your Step-by-Step Guide to the ADU Build Process
Building an ADU is a multi-phase project that typically takes 8-12 months. Working with a design-build firm, which handles everything from design to construction, can streamline this journey by improving communication and accountability.

Phase 1: Design, Feasibility, and Permitting
This foundational phase turns your idea into a buildable plan and typically takes 3-5 months.
- Consultation & Site Assessment: Define your goals (rental income, family housing) and assess your property’s zoning, setbacks, and topography. This may involve a professional site survey to map property lines and a geotechnical (soils) report if you are on a slope or in a liquefaction zone.
- Budgeting & Zoning: Develop a detailed budget while confirming compliance with local city ordinances. For a custom estimate, you can See Personalized Budget.
- Design Development: Create architectural drawings, floor plans, and exterior elevations that match your vision and budget.
- Construction Drawings: Prepare detailed plans, including structural engineering, MEP (mechanical, electrical, plumbing), and Title 24 energy calculations required for California’s energy code.
- Permit Submission: Submit the complete set of drawings and documents to the local building department for review. The 60-day review clock starts once the city deems the application complete.
Phase 2: Site Work and Foundation
With permits in hand, physical work begins. This phase can take 2-4 weeks.
- Site Clearing & Grading: The build site is cleared of obstacles, leveled, and prepared for the new foundation.
- Utility Trenching: Trenches are dug to run water, sewer, gas, and electrical lines from the main house or street to the ADU. This may require significant upgrades, such as a new electrical panel or a larger water meter, which can add to the cost.
- Foundation Pour: The concrete foundation is poured, which includes installing any under-slab plumbing first. This is a critical step that requires a city inspection before concrete is placed.
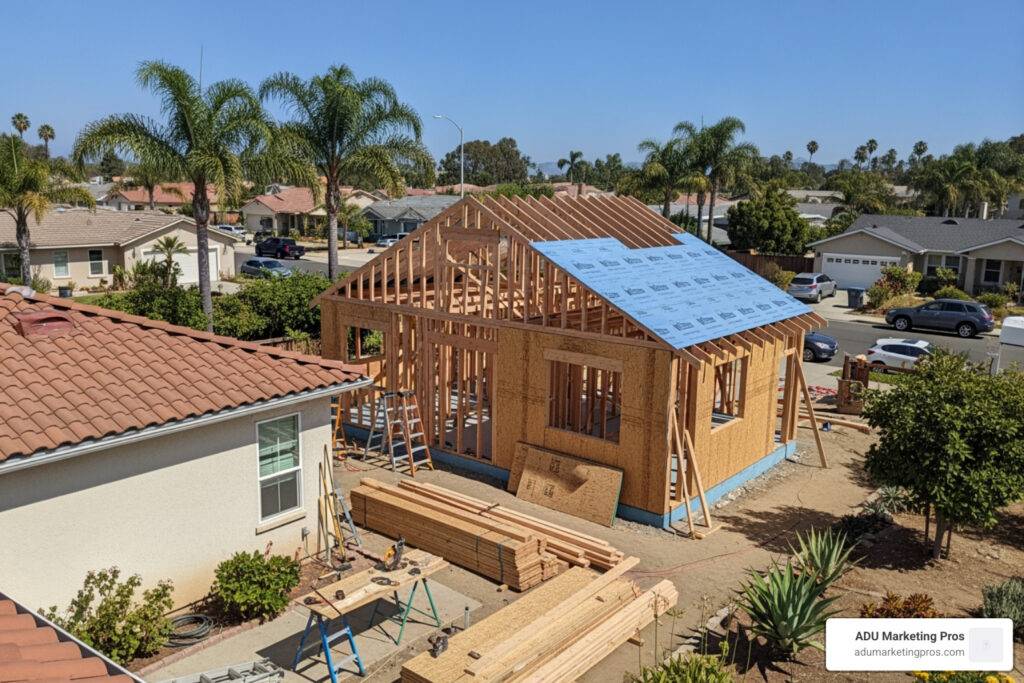
Phase 3: Framing and Exterior
Your ADU’s structure takes shape over 3-6 weeks.
- Framing: The walls, floor, and roof structure are assembled.
- Sheathing: Plywood or OSB panels are attached to the exterior frame for structural stability.
- Windows & Doors: Exterior windows and doors are installed to enclose the structure.
- Roofing & Siding: The roof and exterior siding are installed, making the building “water-tight” and protecting it from the elements.
Phase 4: Interior Rough-In and Finishes
Work moves inside to install systems and add finishes, taking 6-10 weeks.
- MEP Rough-In: The hidden infrastructure for HVAC, electrical wiring, and plumbing pipes is installed within the walls and ceiling. This phase requires a major inspection before any drywall is installed.
- Insulation & Drywall: Insulation is added for energy efficiency and soundproofing, followed by another inspection. Drywall is then hung, taped, and textured to create the interior walls.
- Painting & Flooring: The interior is painted, and flooring materials like tile, wood, or carpet are installed.
- Cabinetry & Fixtures: Kitchen and bathroom cabinets, countertops, light fixtures, and plumbing fixtures (sinks, toilets, showers) are installed.
Phase 5: Final Touches and Occupancy
The project is nearly complete, taking 2-4 weeks.
- Final Inspections: The city building inspector conducts final checks of electrical, plumbing, mechanical, and building safety to ensure all work meets code.
- Certificate of Occupancy: After passing all inspections, the city issues a Certificate of Occupancy, making the ADU legal to inhabit.
- Utility Hookups: Final utility connections are made and meters are activated.
- Landscaping: Optional landscaping is completed to integrate the ADU with your property. You can find inspiration from various outdoor landscaping products.
Assembling Your A-Team: Finding the Right ADU Contractor
Choosing the right contractor is critical for a successful ADU project. An ADU specialist brings expertise in navigating state and local regulations, managing small-footprint construction, and coordinating utility connections. Experienced builders in your area, like Otto ADU in Los Angeles, Snap ADU in San Diego, SFBayADU in the Bay Area, or Prada Builders in Palo Alto, understand local codes and can help avoid common pitfalls.
Vetting Contractors
Take your time to vet potential builders thoroughly:
- License & Insurance: Verify their license is active and in good standing with the California Contractors State License Board (CSLB). Confirm they have both general liability and workers’ compensation insurance to protect you from liability.
- References & Portfolio: Contact at least three recent references and ask about their experience with communication, budget, and timeline. Review their portfolio of past ADU projects to assess quality and style.
- ADU Experience: Ask specifically how many ADUs they have completed in your city and their familiarity with the latest state and local laws. An experienced ADU builder will anticipate challenges that a general contractor might miss.
Comparing Bids and Contracts
When comparing bids, look beyond the total price. A good bid is highly detailed and transparent.
- Scope of Work: It should clearly list every task and material included in the price. Vague descriptions like “install fixtures” are a red flag.
- Allowances: Pay close attention to allowances, which are placeholder amounts for items you’ll select later (e.g., a $3,000 allowance for kitchen appliances or $5/sq ft for flooring). If your choices exceed the allowance, the final cost will increase. Ensure allowances are realistic for the quality you expect.
- Contract Type: Understand the contract structure. A fixed-price contract offers cost certainty but can be rigid if you want to make changes. A cost-plus contract (where you pay for actual costs plus a builder fee) offers more transparency and flexibility but carries the risk of going over budget. Discuss which type is best for your project and risk tolerance.
10 Essential Questions to Ask a Potential ADU Builder
- How many ADUs have you successfully completed in my city?
- Are you familiar with the latest California ADU laws and my local ordinances?
- What is your typical timeline for an ADU project from start to finish?
- Can you provide a detailed breakdown of all costs, including permits, materials, and labor?
- What unexpected costs commonly arise, and how do you handle them through change orders?
- How do you manage the permitting process with local building departments?
- What kind of warranty do you offer on your work?
- How do you communicate with clients, and how often can I expect updates?
- Can you provide references from recent ADU clients?
- What is your approach to unforeseen site conditions or design changes?
Financing and Maximizing the ROI of Your California ADU
An ADU is a significant investment that can offer substantial financial returns. Understanding the costs, financing options, and rental income potential is key to maximizing your return on investment (ROI).
Understanding ADU Construction Costs in California
The cost for ADU construction California typically ranges from $150 to $400+ per square foot. A 500-square-foot ADU might cost $125,000, while a 1,200-square-foot unit could exceed $400,000. The final price depends on the ADU type, location, site conditions, and level of finishes.
- Core Costs: Design, engineering, permits, construction labor, and materials.
- Site-Specific Costs: These variables can significantly impact the budget. They include major utility upgrades (a new electrical panel can cost $3,000-$7,000), long utility trenches, difficult site access for machinery, or extensive grading and foundation work for hillside properties.
- City Fees: Expect plan check, permit, and impact fees. In California, ADUs under 750 square feet are exempt from impact fees, which can save you thousands of dollars.
How to Pay for Your ADU
Several financing options can help you fund your project:
- Cash: The simplest option, avoiding interest payments and loan fees.
- Home Equity Loan or Line of Credit (HELOC): Borrow against the equity in your primary home, often at favorable rates. This is a popular choice for homeowners with significant equity.
- Construction Loan: A short-term loan that funds the project in stages (called draws) as work is completed and inspected. The loan is typically converted to a traditional mortgage upon completion.
- Renovation Loan: Programs like the FHA 203k or Fannie Mae HomeStyle allow you to roll the cost of ADU construction into a new mortgage or refinance.
- Grant Programs: The CalHFA ADU Grant Program provides up to $40,000 to help qualified low- and moderate-income homeowners cover pre-development costs like planning and permit fees. This program has reopened with new funding, so check with local housing organizations for availability and eligibility requirements.
Renting Your ADU for Maximum Return
Rental income is a primary driver for building an ADU in California. This income can offset your mortgage, pay for the construction, and build long-term wealth. For example, a $300,000 ADU financed with a loan could be completely offset by a rental income of $2,800 per month, effectively creating a valuable asset for free over the long term.
- Rental Rules: While statewide owner-occupancy requirements have been removed for long-term rentals, local cities can still restrict or ban short-term rentals (under 30 days). Always check your local ordinances before planning to use your ADU for platforms like Airbnb.
- Loan Qualification: Many lenders now allow you to use projected rental income from the ADU to help you qualify for your construction loan. This makes financing more accessible for many homeowners. Learn more about Fannie Mae ADU rental income rules.
Frequently Asked Questions about ADU Construction in California
Here are answers to some of the most common questions about ADU construction California.
How long does it take to build an ADU in California?
The entire process, from design to move-in, typically takes 8 to 12 months. This can be broken down into three main phases:
- Design & Permitting (3-5 months): Creating construction plans and securing city permits. California law requires cities to review a complete application within 60 days.
- Construction (4-6 months): The physical build, from foundation to final finishes.
- Final Steps (1 month): Passing final inspections and getting the Certificate of Occupancy.
Project complexity, contractor schedules, and city response times can affect the overall timeline.
Can I build an ADU on my property?
Most likely, yes. California state law allows ADUs on virtually all properties with an existing single-family or multi-family home. State laws preempt (override) local ordinances that would otherwise prohibit ADUs. While you are generally eligible, it’s still essential to conduct a feasibility study to understand your specific lot’s potential and any objective local standards (like design or materials) that may apply.
Do I have to live on the property to rent out my ADU?
No. As of January 1, 2024, a new state law (AB 976) prohibits cities from requiring owner-occupancy for ADUs. This means you are free to rent out both your primary home and your ADU for long-term tenancies.
However, be aware that this rule applies to long-term rentals. Local cities and counties still have the authority to restrict or ban the use of ADUs as short-term rentals (e.g., Airbnb rentals for less than 30 days). Always check your local city’s specific rules on this matter.
What are the biggest hidden costs in ADU construction?
The most common unforeseen costs arise from site conditions and utilities. These can include:
- Utility Upgrades: Needing a new, larger electrical panel for the whole property or upsizing the water or sewer line to the street. These can cost thousands of dollars.
- Soil and Foundation Issues: Poor soil quality may require more extensive and expensive foundation engineering. Building on a steep slope will always cost more than building on a flat lot.
- Site Access: If your backyard is difficult to access with machinery, more work must be done by hand, increasing labor costs.
How will an ADU affect my property taxes?
Building an ADU will increase your property taxes, but it will not trigger a reassessment of your entire property’s value. Instead, your county assessor will perform a “blended assessment.” Your existing home will retain its current assessed value under Prop 13. The new ADU will be assessed at its market value upon completion, and a supplemental tax bill will be issued for the new construction only. The increase is typically manageable and far less than the rental income the ADU can generate.
Conclusion: Build Your Future with a California ADU
The ADU construction California movement offers a powerful opportunity for homeowners across the state, from Los Angeles and San Diego to the San Francisco Bay Area. By adding a second unit, you can open up significant financial and personal benefits, transforming an underutilized backyard into a valuable asset.
We’ve covered the types of ADUs, the evolving legal landscape, the step-by-step build process, and the financial considerations. The key advantages are clear:
- Housing Flexibility: Create a comfortable home for aging parents, adult children, or a dedicated private workspace.
- Financial Returns: Generate substantial rental income to pay your mortgage, cover the construction cost, and build long-term wealth.
- Increased Property Value: Significantly boost the market value and appeal of your entire property.
Building an ADU is a complex but entirely achievable goal that serves as a direct investment in your property, your family, and California’s housing future. The path from initial concept to a finished, income-producing unit is clearer than ever thanks to streamlined laws and a growing industry of specialists. With the right knowledge and an experienced team, you can navigate the process with confidence and unlock the full potential of your property.
At ADU Marketing Pros, we specialize in connecting homeowners with the expert ADU builders and architects who can turn this vision into a reality.